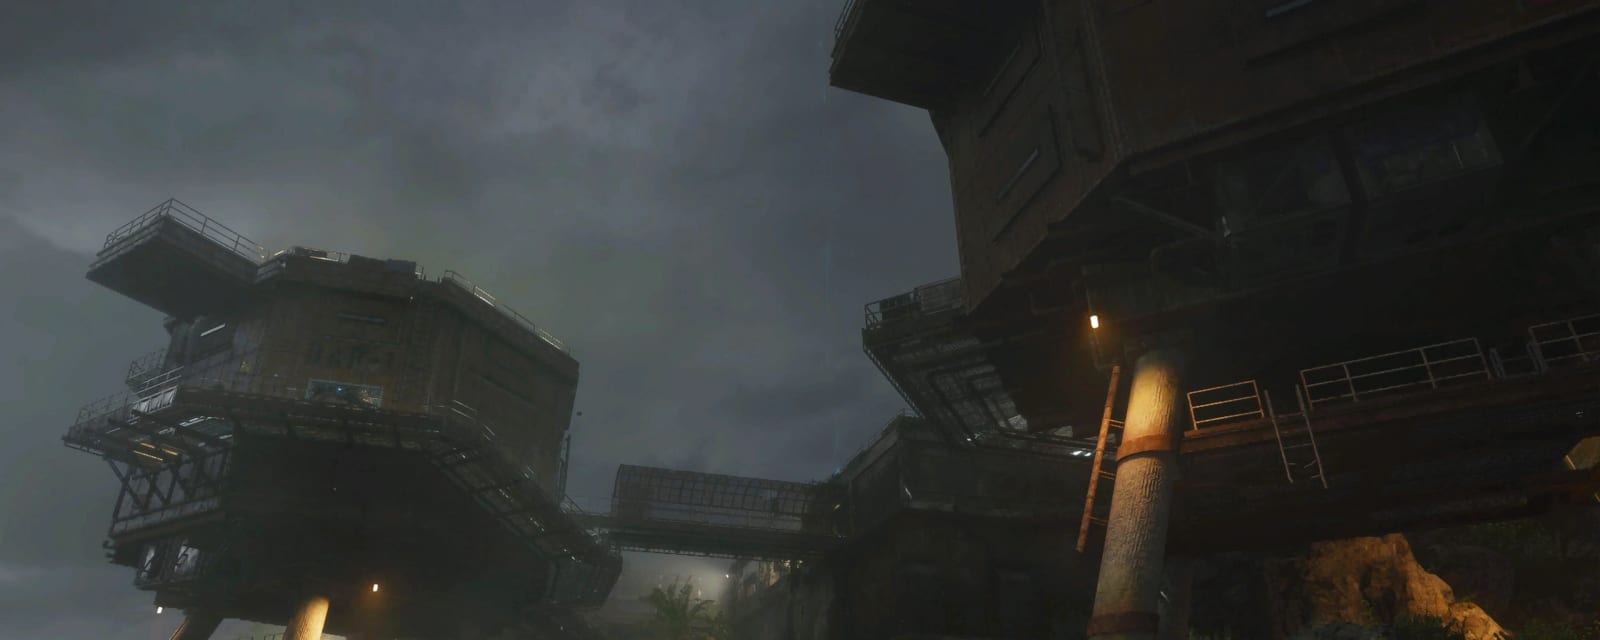

Terminus
The BO6 launch co-headliner — a black-site prison on a scatter of Pacific islands linked by boats and ziplines. Raise power, build the DRI-11 Beamsmasher, free and kill the Nathan Amalgam, then repair the network and defeat Patient 13 in the No Mo' Modi main quest. Fully solo-capable; co-op eases the timed steps.
Quick answers
Terminus is a Black Ops 6 launch map — a black-site prison on a scatter of Pacific islands linked by boats and ziplines. Its 13-step main quest, 'No Mo' Modi', has you raise power, build the DRI-11 Beamsmasher, kill the Nathan Amalgam, repair the network, then defeat the boss Patient 13. Rated Hard; 45–90 minutes, solo-capable.
Where is Pack-a-Punch on Terminus?
Pack-a-Punch is in the Bio Lab. Activate all three AMP generators — one in front of spawn, one in the Living Quarters opposite Jugger-Nog and one in the Bio Lab — holding each defence wave, then dive into the Bio Lab water and interact to lift the Pack-a-Punch platform.
What is the Wonder Weapon on Terminus?
The Wonder Weapon is the DRI-11 Beamsmasher. Activate the three laptops, Dead Wire the electrical-box chain to open the Research Office, collect the multiphasic resonator, then complete the three island orb rituals and build it at the Research Office bench.
Who is the boss of Terminus?
The boss is Patient 13, a giant tentacled amalgam. Shoot the red spore bubbles in phase one, the mouth and arm-tentacle glow spots in phase two, and the eyes in phase three — never touch the tongue in the middle of the arena, which is an instant down.
What is the keypad code on Terminus?
The three-digit keypad code changes every game. You can solve it from the whiteboard maths, but the quick route is to bribe Dr. Peck 5,000 points at his window in spawn — the answer then appears on the monitor to his left.
How many steps is the Terminus Easter egg?
The Terminus main quest is 13 steps and runs roughly 45–90 minutes, rated Hard and solo-capable for 1–4 players. The network, buoy and bomb steps are strictly sequential and timed — the buoys have a two-minute clock and the three bombs a five-minute fail state.
Map & Key areas
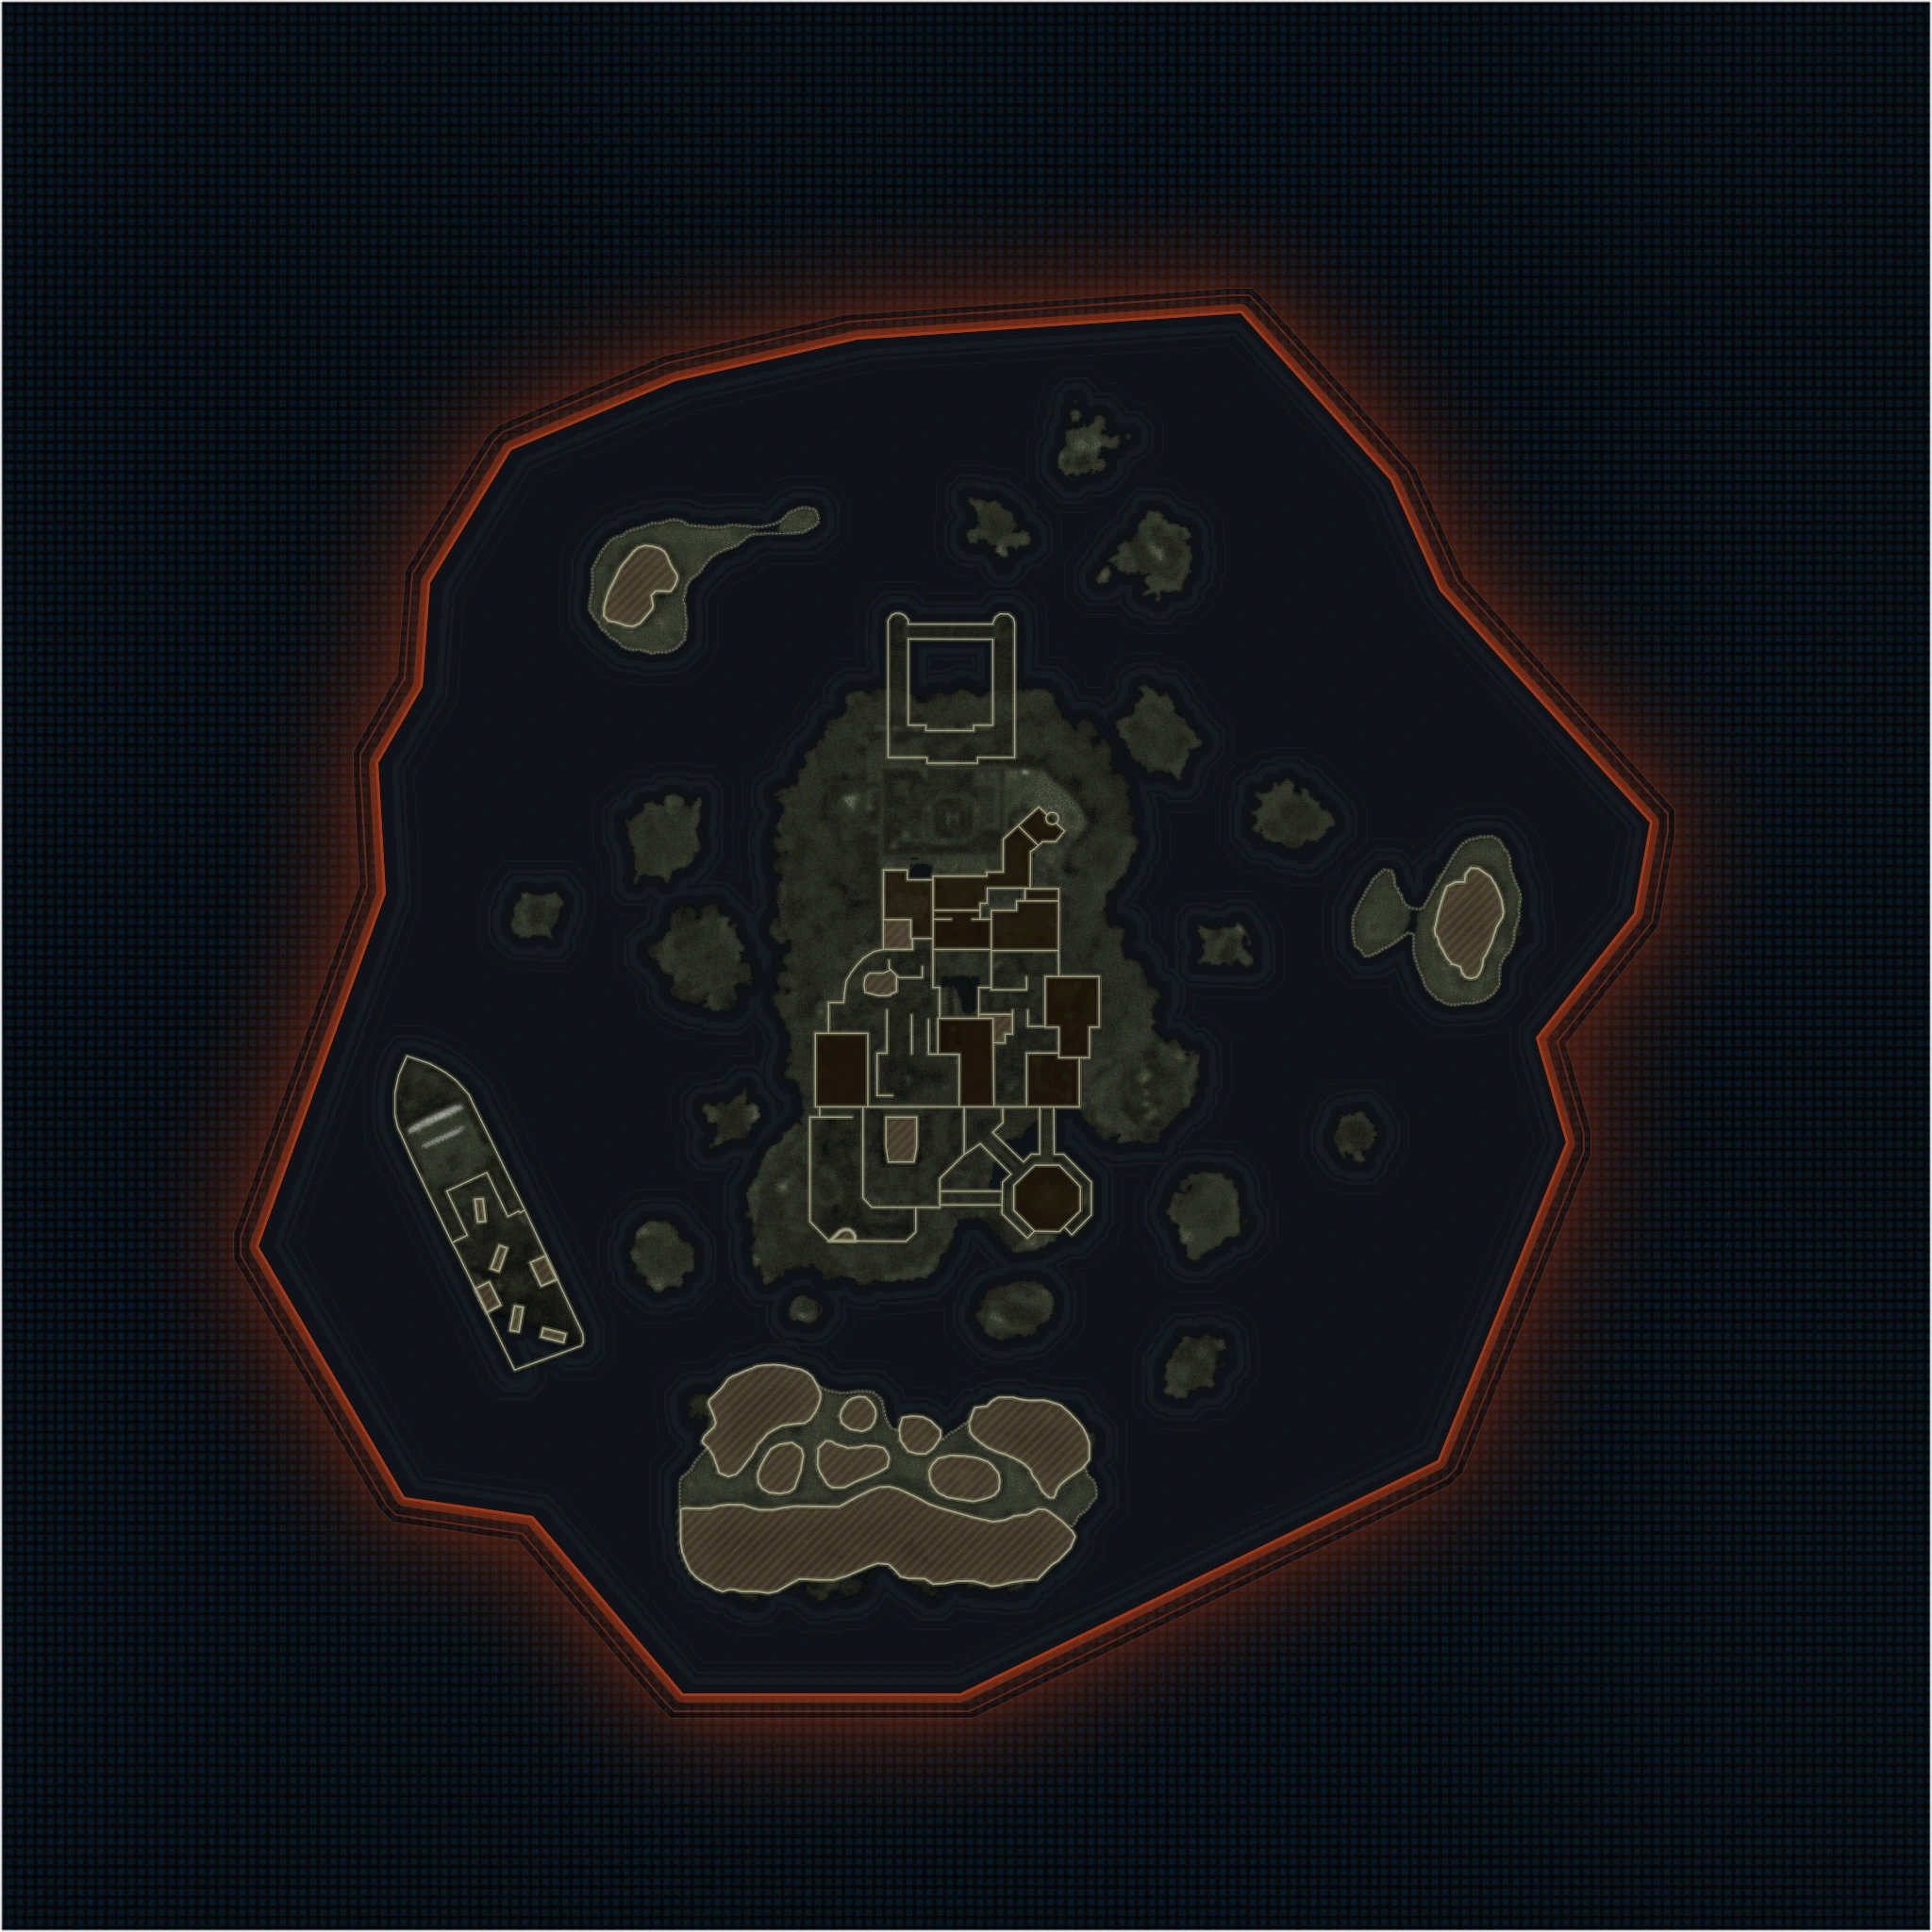
The map layout first, then the areas worth knowing by name. Map imagery © Activision, self-hosted.
Surface
Underground
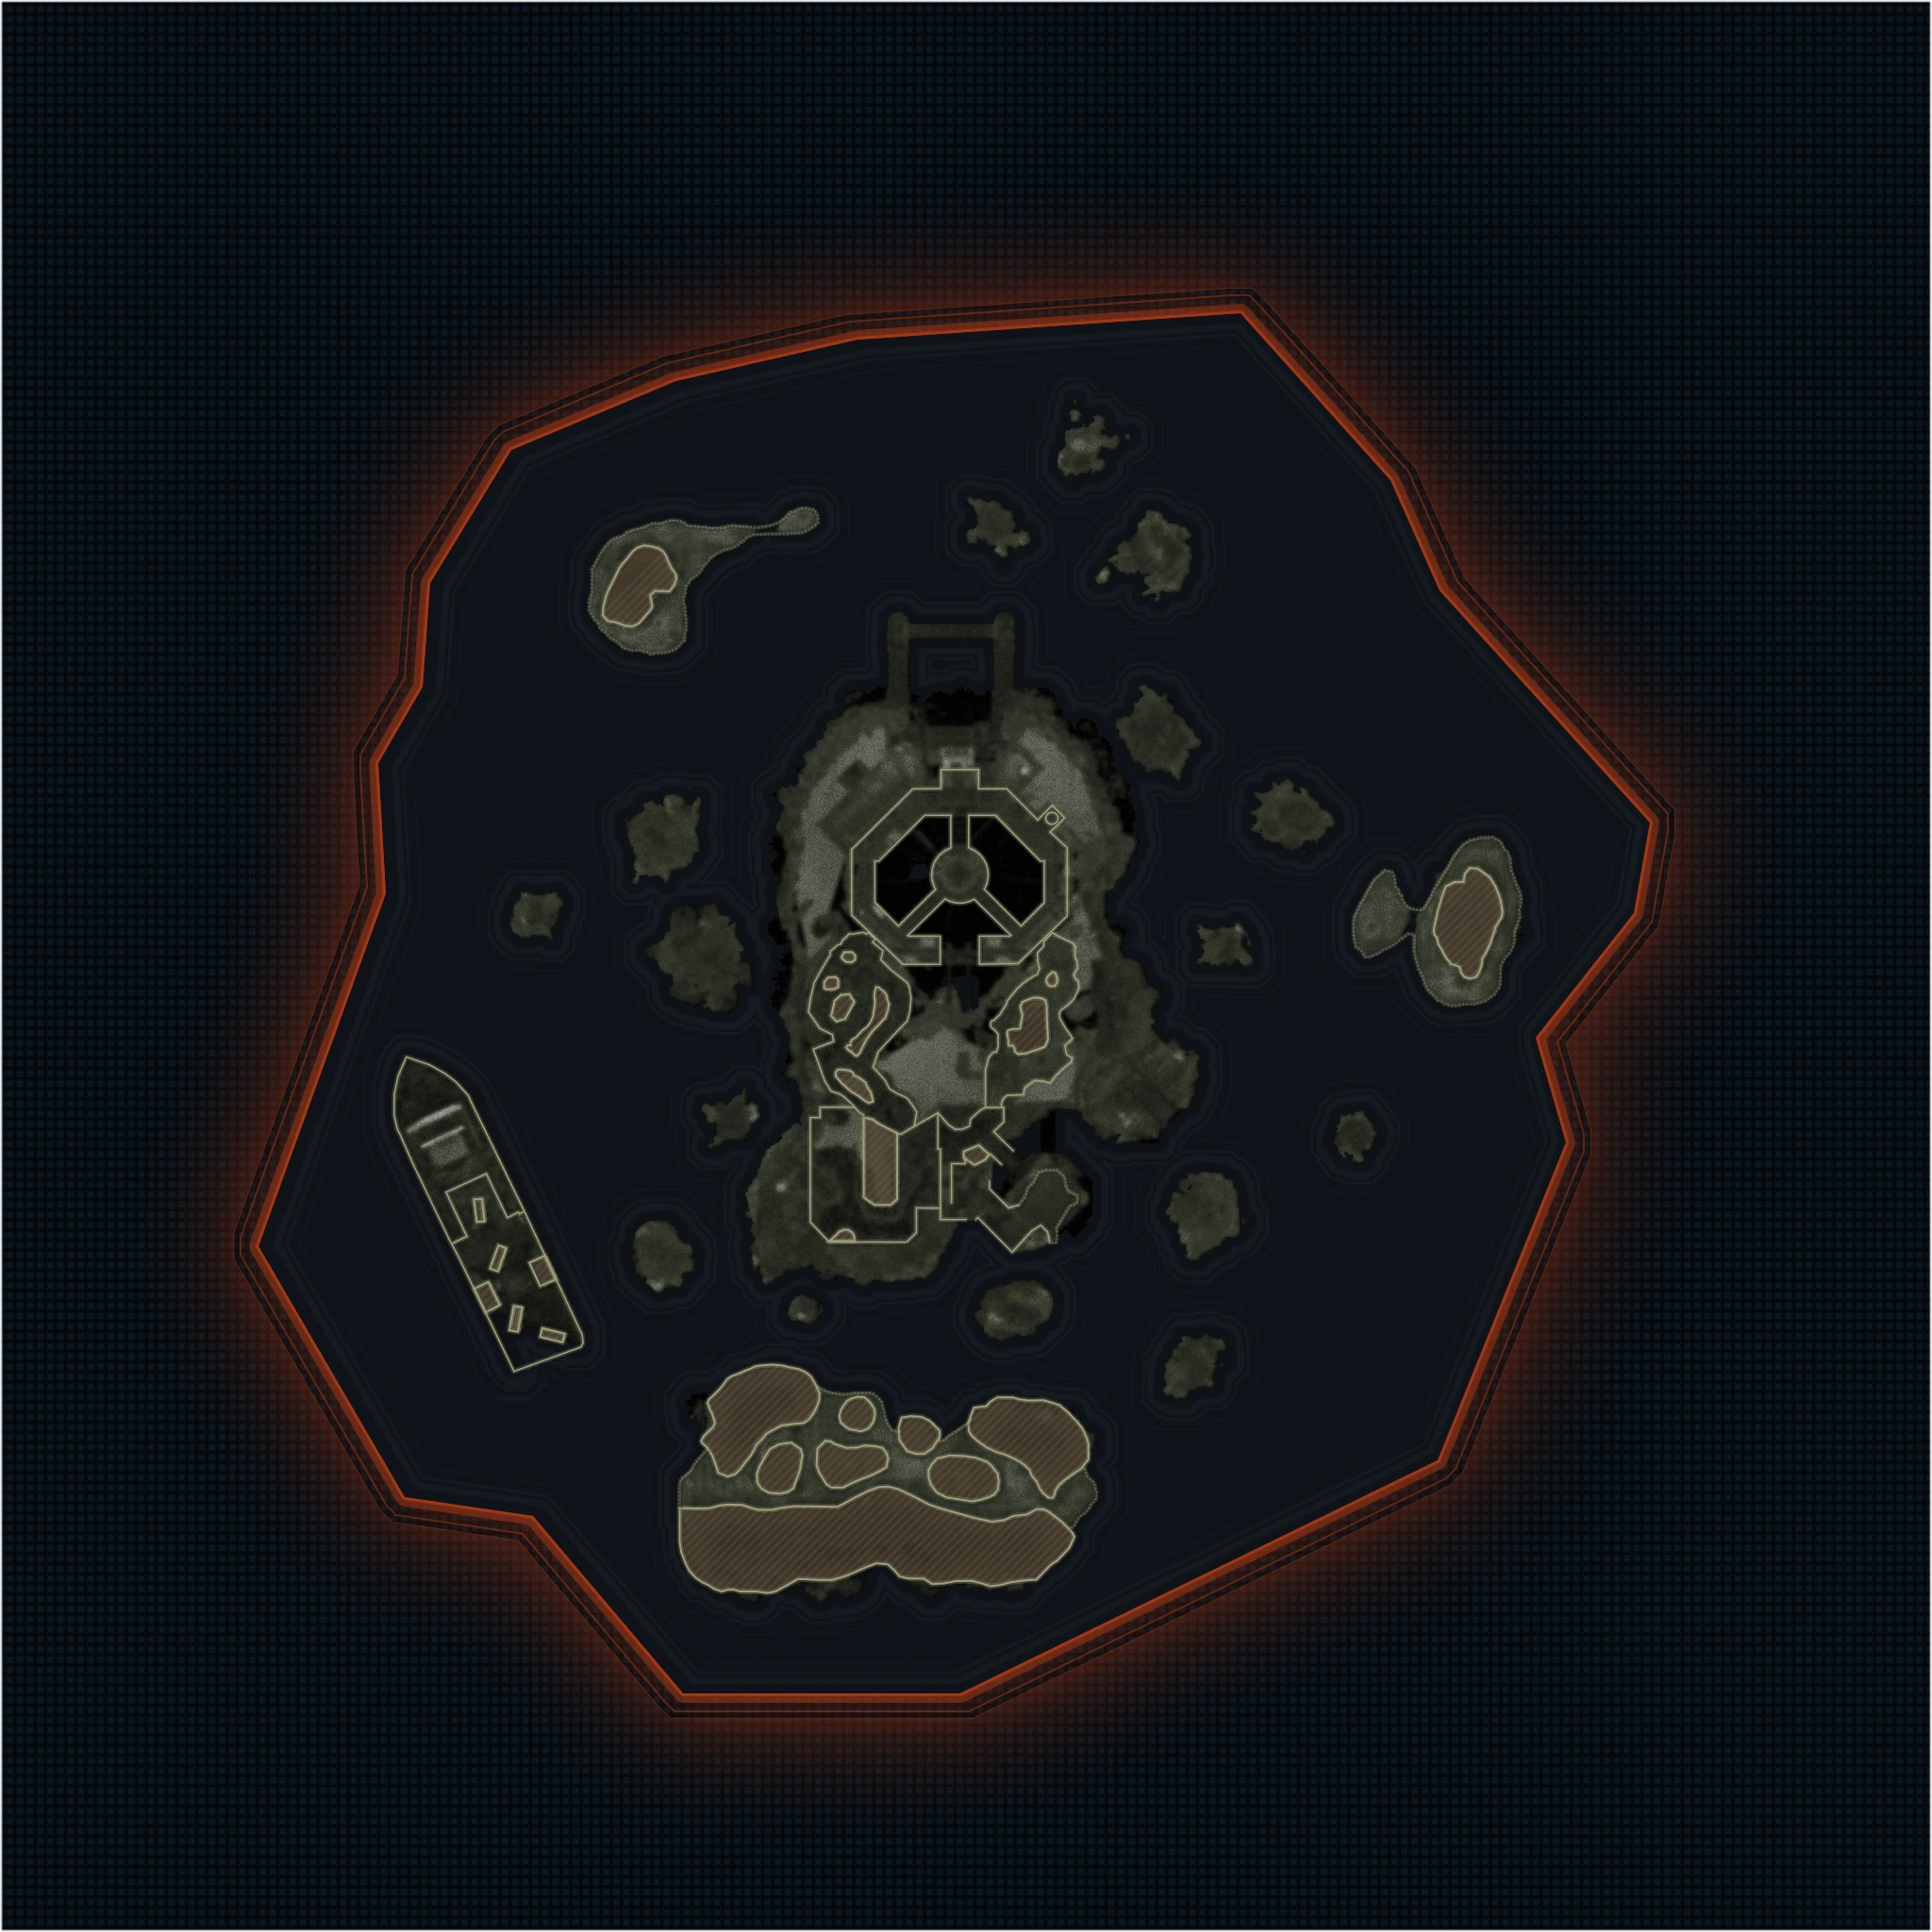
Pinch or double-tap to zoom in — the full map is a single image.
Prison / Guard Station
Spawn. AMP Generator 1, Peck & Strauss terminals, Armory lockers, route to Interrogation and Living Quarters.
Living Quarters / Rec Yard
AMP Generator 2, Jugger-Nog, two of the Research Office electrical boxes, route toward Engineering.
Engineering / Sea Tower
Raft access, the Multiphasic Resonator briefcase, Elemental Pop, and the “Days Since Last Injury” sign; descent to Docks.
Bio Lab
AMP Generator 3, Inclined Lift + Pack-a-Punch, Nathan's chamber, the three bombs, Melee Macchiato, and Patient 13's door.
Sea Caves / Shipwreck
Node repair points, the Cursed Talisman map, and the Shipwreck's hidden underwater room holding two Node Connectors and the purple orb.
Islands — Castle Rock / Crab / Temple
Blue, green and purple Resonator orb stages; Cursed Talisman skeletons and side routes.
Steps at a glance
- Activate the 3 AMP generators → defend each one
- Dive into the Bio Lab pool to raise Pack-a-Punch
- Activate the three laptops — X first
- Dead Wire the electrical box chain → opens the Research Office
- Kill the trapped zombie for the EMF fob
- Collect the multiphasic resonator from the Sea Tower briefcase
- Bribe Dr. Peck 5,000 points for the keypad code
- Three island orb rituals → build the Beamsmasher
- Beamsmasher the tentacle trap → hard drive → Peck
- Read the 3-digit tank code → beat Nathan the Amalgam
- Gold keycard → shipwreck node connectors → repair the pipes
- Hack the three buoys (2-min timer) → defuse three bombs (5-min timer)
- Boss: Patient 13 — spores, then arms and mouth, then the eyes
Full walkthrough
Power the map and raise Pack-a-Punch
Activate all three AMP generators — the purple machines. Each one spawns a defence wave, so stay close and hold the area until it completes. Then dive into the water in the Bio Lab and interact to lift the Pack-a-Punch platform; it stays available for the rest of the match.
Budget now: you will need 5,000 points to bribe Dr. Peck for the keypad code later, and MrDalekJD recommends 5,000 more to Pack-a-Punch the Beamsmasher before the hard-drive step. Do not spend yourself dry on the openers.
- Generator 1 — directly in front of spawn
- Generator 2 — Living Quarters, opposite Juggernog
- Generator 3 — inside the Bio Lab
Activate the three laptops
Three laptops around the map need interacting with. This begins the free, guaranteed Beamsmasher build.
Shortcut: a Wonderbar! gum (or other side quests) can pull the Beamsmasher straight from the Mystery Box, letting you skip the whole build. The quest route below is the only guaranteed one.
The other guide: MrRoflWaffles does the laptops in any order and before touching Dead Wire, so treat the order as free. MrDalekJD insists on X first; if a laptop refuses to register, that is the thing to try.
- X — below the Sea Tower, on the docks side near Quick Revive
- Y — up the side of the storage area, just outside spawn to the right, below Stamin-Up
- Z — in Communications, just past the Control Center on a small outcrop
Dead Wire the box chain to open the Research Office
Buy the Dead Wire ammo mod from an Arsenal machine with Salvage and put it on a weapon. Go to the inclined Pack-a-Punch lift and send it moving, then shoot the electrical box visible through the window while the lift travels. It sparks, and the current jumps along the wall to the next box.
Shoot the chain in sequence — three around the lift shaft, then one above the second generator in Living Quarters, then run outside for the final box on the side wall. The doors into the Research Office open.
Confirmation cue: inside, kill the trapped zombie lying on the floor — it drops the EMF fob, a character quote plays, and the fob appears as the leftmost quest item on your scoreboard. This room holds the Beamsmasher bench.
Collect the parts and crack the keypad code
Hold interact on the briefcase on the table in the Sea Tower; it pops open — take the multiphasic resonator. Turn around into Engineering and grab the battery off the desk. Back at the Research Office, interact with the computer to seat the resonator on top of the machine.
Holding interact on the computer shows three sticky notes labelled X, Y and Z plus d-pad dials taking three values. The code changes every game. There is a legitimate maths route on the whiteboards, but both creators just bribe Dr. Peck — pay 5,000 points at his window in spawn and the answer appears on the monitor to his left.
Confirmation cue: the machine starts targeting. Go to the next round and it finishes, marking one island on your tac map.
Do not walk out empty-handed: pick the multiphasic resonator back off the top of the computer before you leave. The island step is impossible without it, and it is the single most common way to waste a round here.
The other guide: the battery pickup appears only in MrDalekJD’s run — it costs nothing to grab, so take it anyway.
The three island orb rituals
Raft out to the marked island. A blue orb floats there — interact to place the resonator beneath it. A horde spawns and one zombie glows and smokes blue: that is the one the orb has picked.
Easiest method: kill the glowing zombie directly over the resonator and its essence deposits automatically. Otherwise it drops an essence orb — hold interact to take it into your hands and carry it to the large orb.
Repeat for two to three glowing zombies until the orb vanishes and flies to the next island. Pick the resonator back up before you leave — it does not travel with the orb. Then repeat at the second island (green orb) and third (purple orb).
Confirmation cue: the screen flashes white and the resonator becomes an infused multiphasic injector, shown red in your quest items. Return to the Research Office bench and build the Beamsmasher.
Free the hard drive from a tentacle trap
Pack-a-Punch the Beamsmasher to at least tier 1 first if you can — MrDalekJD reports the step needing the upgraded version. Then find the correct tentacle trap, buy or activate it, and while it is running fire the Beamsmasher’s alt-fire beam along the trapped tentacles. A hard drive pops out.
Which trap? The correct one has a Project Janus keycard lying on the ground directly underneath it — that is the reliable tell, so check the floor rather than guessing.
Take the hard drive to the Guard Station at spawn and hold interact to drop it in the little box for Dr. Peck. He hacks it and starts talking about a specimen in a Bio Lab holding tank.
The other guide: the Pack-a-Punch requirement is MrDalekJD’s only — MrRoflWaffles does not mention it. Upgrading is cheap insurance, so do it if you can afford to.
- Bio Lab — left side
- Bio Lab — on a Bio Lab door
- Wreck yard, near the Juggernog machine
- Spawn, near Peck
Read the tank code and beat Nathan
Hold interact on the central cylindrical tank in the Bio Lab to wake the step — a specimen called Nathan comes to life and speaks. Now gather three digits, entered in this fixed order. The code changes every game.
Gear up before you enter it. The code triggers a lockdown with masses of sprinting zombies plus an elite Amalgam. Bring perks and a Pack-a-Punched gun above green rarity at minimum, and buy support-station equipment for extra damage.
Confirmation cue: the keypad reads UNLOCKED. In co-op all players must then hold the tank’s levers simultaneously — count down over voice chat. The number of valves matches your player count.
The fight: kill the super-strong Amalgam while sprinters flood in, running coordinated trains in the same direction so nobody crosses paths. Nathan at zero health plays a cutscene — that is the first half of the Easter egg done.
- Digit 1 — the clock outside, read from the Interrogation rooms; take the short hour hand only (4:23 gives 4)
- Digit 2 — the playing card pinned to the corkboard in the Mess Hall
- Digit 3 — the days-since-last-injury safety sign in Engineering, by the crafting bench
Gold keycard and the green-screen computer
Straight after the cutscene, drop into the water in the Bio Lab and grab the gold keycard off the floor below — the exact spot varies by game. Then go to the Communications room and hold interact for several seconds on the computer with green text until it lights up and prompts you.
The other guide: MrDalekJD skips the green-screen computer entirely, but it appears to be what unlocks the shipwreck hatch — do not skip it. He also reports the keycard pickup triggering a small lockdown, so gear up before diving.
Shipwreck — take the node connectors
Summon a tactical raft and travel to the massive crashed ship. Go underneath it and climb the ladder — a hatch opens into a workshop. Take the node connectors (cylinders) from the table — one per player.
It locks behind you. Picking them up seals the hatch and starts a two-minute lockdown inside the workshop. In co-op put one player on each of the four windows. The cue that it is over is a Max Ammo drop and the hatch reopening into the water.
Carrying rule: you cannot sprint while holding a cylinder — factor that into the swim back.
The other guide: MrDalekJD takes exactly two regardless of squad size.
Repair the pipes
Fit the connectors into gaps in the pipework. Which pipes are broken varies every game, so check each location — an already-connected pipe is how you know it is not yours this run.
You are vulnerable while fitting: installing runs a crafting animation you cannot cancel. Clear the area first, or have a teammate cover you.
Confirmation cue: Samantha’s dialogue finishes.
- Crab Island (the south island) — on the shore, left-hand side as you land
- Underneath the Sea Tower by the docks, near the rappel cord — look for the visible gap
- The sea caves on the right side, by the Speed Cola tunnel
Hack the three buoys
Collect the gold hacking device at the Guard Station in spawn — hold interact by Peck and let roughly thirty seconds of his audio play before it pops out. Then raft out to the satellite buoys and hold interact at each; your character pulls out a laptop and hacks for about ten seconds.
Timed: after the first hack a two-minute countdown starts for the rest. Full-send between buoys.
Co-op: the driver stays in the boat and the hacker jumps in the water; the driver circles away and comes back for the pickup, which splits the attention of the tentacle monster.
Confirmation cue: a white flash, an immediate round skip, then thirty to forty-five seconds of dialogue. If the dialogue does not play and the timer is still on screen, there is another buoy to find — keep searching until the timer clears.
- Buoy 1 — from the docks turn left, past Crab Island, to the far back of the map
- Buoy 2 — back past Crab Island toward the shipwreck
- Buoy 3 — past the shipwreck, straight north past another island
Defuse the three bombs
Head straight back through the tunnel to the Bio Lab. Three devices appear on doors and each takes roughly fifteen seconds of held interact to defuse.
This one can end your run: you have about five minutes. Fail it and the map blows up — it is a genuine fail state, not a retry. Be standing in the Bio Lab before you trigger it.
Solo: cover the fifteen-second holds with Monkey Bombs or Aether Shroud. Co-op: one player holds while the others defend, and bring everyone — the clock does not care.
Confirmation cue: screen flash and the timer disappears. The boss is next, but there is no rush from here — take as many rounds as you want to prepare.
- Bomb 1 — bottom floor of the Bio Lab, to the left
- Bomb 2 — opposite side of the same lower Bio Lab area
- Bomb 3 — upstairs on the second floor, directly above the Melee Macchiato machine
Boss fight — Patient 13
Prep first: at least one bullet weapon at tier-3 Pack-a-Punch and legendary rarity (ideally both weapons), Dead Wire on it, a self-revive kit and a Chopper Gunner bought with Salvage, and a boss-fight gum pack with three ready. Ammo can also be bought at the back of the arena mid-fight. In co-op all players must vote to start.
Movement rules for phases 1 and 2: run a constant train in one direction, and in co-op agree that direction so trains do not collide. The boss surfaces on a side and slams directly in front of itself — that can insta-down you, so never stand in front of where it comes up. Being swatted into the water is survivable; climb back via the ladders, but expect zombies camped at the top.
Phase 1: shoot the big red spore bubbles on its shoulders and sides. Enough damage and it submerges — kill the remaining background tentacles to force it back up.
Phase 2: new health bar. Crits move to the mouth at the bottom of its body and to the glowing spots on its left and right arm-tentacles. Tentacle projectiles get nastier. The Chopper Gunner is excellent here, but your body stays on the ground and can be swatted out of the streak — use it from a corner. Avoid the middle water near the boss; it downs you instantly this phase.
Phase 3: hold the back of the arena. The new crit is the eyes — pop them whenever exposed. When the boss emits blue smoke it is charging a wipe attack: get behind the boxes or it insta-downs you. Never touch the tongue in the middle of the arena — being sucked toward the mouth is an instant down. Idolize trivialises this phase.
The other guide: MrDalekJD describes phase 3 as splitting the arena in half, crossed via the water and ladders, rather than simply holding the back.
Side Easter Eggs & extras
Everything beyond the main quest. Tap any entry to open the full how-and-where breakdown.
“Can You Hear Me? (Come In)” — Kevin Sherwood
Interact with three Mr. Peeks bunny headsets. 1) Engineering — on the cable wheel/coil (after Gen 1, through the left room, down the stairs, turn right). 2) Mines by PhD Flopper — on the barrels right of the machine, next to the one with a lamp on it. 3) Bio Lab — in the cabinet in the third-level office. Song name verified via GameSpot/PCGamesN; some outlets decline to spoil it.
Cursed Talisman — Treasure Hunter route
Buy Melee Macchiato (lower north Bio Lab). In Sea Caves, melee the cracked treasure-map wall to reveal Captain Gregg; record the random X, raft there, dive and collect the Watch, return it. Take three Molotovs; burn the skeletons at Temple Island, Castle Rock and Shipwreck, kill each special and grab its Cursed Coin. Return all three coins for Legendary weapons and a final X at Crab Island; stay on Crab Island three full rounds, then open the spawned chest for the Talisman (big Essence gain, but penalises you when hit).
Mega Stuffy
Collect six stuffed-animal pieces around the islands and assemble them in Living Quarters for a flying companion that attacks, revives and drops support.
Boat Race
Trigger the Mr. Peeks boat interaction, pick a course and drive the gates for timed loot — do it before the timed main-quest boating steps.
More extras
Cooking Fish in the Mess Hall for temporary effects; the Rec Yard Basketball shot for Essence (use a scoped weapon); the Void Cannon meteor for high-tier loot; and hidden target shots that grant one-use power-ups.
Recommended loadouts
Three strong picks for this map — the map's Wonder Weapon plus reliable box/wall options. Each weapon lists a full recommended attachment build and the perks to pair with it, every perk shown with its Major and Minor augment. Push weapons to Legendary rarity and Pack-a-Punch; augment/attachment metas shift with balance patches, so treat these as a strong current baseline.
DRI-11 Beamsmasher (crafted / upgraded)
Energy wonder weapon+Craft at the Research Office workbench after the three island orbs, or pull from the box. Primary fire ramps damage; the alt-beam slows and exposes targets — superb for hordes and the tentacle-trap shot, but pair it with a bullet gun for boss DPS.
Attachments
- —Wonder Weapon — no Gunsmith attachments
Perks & augments
- Jugger-NogMajorProbiotic — more maximum healthMinorDurable Plates — tougher armour
- Speed ColaMajorPhantom Reload — magazine refills over timeMinorQuick Swap — faster weapon swaps
- Stamin-UpMajorDasher — longer tactical sprintMinorHot Foot — speed burst on equipment kills
- Elemental PopMajorElectric Cherry — shock burst on reloadMinorChill Berry — faster Ammo-Mod cooldowns
- Quick ReviveMajorDying Wish — brief invulnerability on lethal hitsMinorSlow Death — longer last-stand timer
The Beamsmasher self-charges, so lean the perks into survivability and mobility rather than ammo economy.
ASG-89 (PaP III / Legendary)
Close-mid crowd shredder+Auto shotgun that excels against Patient 13's weak points at close-mid range and clears the bomb-defuse and lockdown swarms. Rarity it up and run Napalm Burst for the red boils.
Attachments
- OpticKepler Microflex (or iron sights)
- MuzzleSuppressor
- BarrelCHF Barrel
- UnderbarrelRanger Foregrip
- MagazineExtended Mag II
- Fire ModsRapid Fire
- StockLight Stock
Perks & augments
- Jugger-NogMajorReactive Armor — plate breaks stun nearby zombiesMinorDurable Plates — tougher armour
- Speed ColaMajorClassic Formula — even faster reloadsMinorQuick Swap — faster weapon swaps
- Deadshot DaiquiriMajorDead Again — crits can add a bullet to the magMinorDead Break — extra armour damage
- Stamin-UpMajorStalker — faster movement while aimingMinorHot Foot — speed burst on equipment kills
- PhD FlopperMajorPhD Slider — slide into a group to detonateMinorTribologist — longer, faster slides
- Death PerceptionMajorDeath Stare — chance to instantly drop wounded specialsMinorBird's-Eye View — faster minimap scan
With Napalm Burst as the Ammo Mod, the ASG-89 shreds Patient 13's red boils.
GS45 akimbo (→ Mustang & Sally)
Reliable boss DPS+The GS45 Pack-a-Punched into an akimbo Mustang & Sally throws explosive rounds — the dependable high-DPS boss tool the Beamsmasher isn't. Keep it Legendary, PaP III and fully fed for the three Patient 13 phases; a low-recoil AR is a fine bullet alternative if you prefer hitscan.
Attachments
- MuzzleSuppressor
- MagazineExtended Mag II
- LaserSteady Aim Laser
- Rear GripCQB Grip
- Fire ModsRapid Fire
- StockAkimbo
Perks & augments
- PhD FlopperMajorPhD Slider — slide-into-group detonationsMinorTribologist — longer, faster slides
- Jugger-NogMajorProbiotic — more maximum healthMinorHardened Plates — more plate damage-block
- Speed ColaMajorPhantom Reload — magazine refills over timeMinorQuick Swap — faster weapon swaps
- Stamin-UpMajorDasher — longer tactical sprintMinorHot Foot — speed burst on equipment kills
- Deadshot DaiquiriMajorDead Again — crits can add a bulletMinorDead Break — extra armour damage
- Quick ReviveMajorDying Wish — brief invulnerability on lethal hitsMinorSlow Death — longer last-stand timer
PhD Flopper is non-negotiable — Mustang & Sally's explosive rounds will otherwise down you at close range.
Recommended kit & gum picks
The recommended kit for this quest. Both creators' loudest prep advice is the part most people skip: buy a self-revive kit and a Chopper Gunner with Salvage before you start Patient 13, and switch to a dedicated boss GobbleGum pack. Dead Wire is quest-required for the electrical boxes. Weapons are in Recommended loadouts above.

Aether Shroud
Vanish for a few seconds to buy space — the cleanest cover for the Dead-Wire box hunt, the Node-Connector lockdown and the timed buoy and bomb runs.

Energy Mine
A placed blast for lane control if you'd rather have clear than stealth.

Dead Wire
Arcs chain lightning between targets. Mandatory to power the five electrical boxes that open the Research Office.

Napalm Burst
Burning rounds tear through Patient 13's red side boils.

Cryo Freeze / Light Mend
Slows and adds weakness damage to the arm and mouth weak points.
Kazimir Grenade
A mini black hole that pulls a packed lane together and clears it — strong on the generator and bomb holds.

Monkey Bomb
Distraction bait — throw it to peel zombies off the defuser during the bomb and Node-lockdown steps.

Perkaholic
UltraEvery perk on the map at once — the strongest single solo opener.

Phoenix Up
LegendaryRevive with all perks kept — your solo insurance through the timed steps.
Wall Power
LegendaryNext wall-buy comes Pack-a-Punched — a cheap early power spike.

Dead Drop
EpicMore salvage and equipment for ~5 min — bank armour plates and Ammo Mods.

Free Fire
EpicNo ammo consumed for 60s — a free damage window on Patient 13.

Shields Up
RareRefills armour at 2× strength for 3 min — the gum both creators bring on every map, and blue rarity so you will actually have it.

Idle Eyes
LegendaryZombies idle for 30s — the creators’ standard boss-fight reset when the room gets away from you.
Perkaholic
UltraFull perks for everyone who pops it.

Nowhere But There
EpicTeleport to a downed team-mate and revive nearby — a lifesaver on the timed boat and bomb steps.
Free Fire
EpicNo ammo for 60s — stack it on the boss.

Temporal Gift
RareExtends your next timed power-up — stretch a Max Ammo or Insta-Kill across the team.
Dead Drop
EpicSalvage and equipment for the whole squad.
Per-map augments
The Major + Minor augment to run on each core perk for this quest. BO6 gives 3 Major and 3 Minor options per perk — pick one of each; these are tuned to this map's boss and steps. Augments unlock at Level 11; metas shift with patches, so treat as a strong baseline. Per-map augment recs are ground no competitor covers.
 Reactive ArmorMinor
 Durable Plates
 Phantom ReloadMinor
 Quick Swap
 Dead AgainMinor
 Dead Break
 DasherMinor
 Hot Foot
 PhD SliderMinor
 Tribologist
 Dying WishMinor
 Slow Death
Calling cards on this map
Cosmetic calling cards you can earn on this map. ⏳ marks time-limited main-Easter-Egg cards — miss the window and they're gone for good. Global Dark Ops challenge cards are in the reference section below.
Terminal
Map challengeComplete the Terminus main quest after Round 50.

Yo Ho Ho
Map challengeEarn 20,000 Essence without taking a hit while a Cursed Relic is equipped.
Main-quest completion card
Main EEComplete the Terminus main quest.
Exact card name not yet confirmed.
⏳ Time-limited — only awarded if you finish before Directed Mode is added for this map; permanently missable afterwards.
GobbleGum reference — Black Ops 6
All 41 Black Ops 6 GobbleGums by rarity — Rare, Epic, Legendary, Ultra and the cosmetic Whimsicals. They drop at end-of-round and you hold up to three. Filter by rarity.

Kill Joy
RareDrops an Insta-Kill.

Cache Back
RareDrops a Max Ammo.
Temporal Gift
RareYour next timed power-up lasts longer.

Stock Option
RareAmmo drawn from your stockpile for 60s.

Anywhere But Here
RareRandom teleport plus a concussive blast.
Arsenal Accelerator
RareFaster Field-Upgrade charge for 5 min.
Shields Up
RareRefill armour at 2× strength for 3 min.

Power Keg
RareDrops a Full Power power-up. (Season 1)

Tactical Diffusion
RareNext Nuke is disabled and pays +2,000 Essence. (Season 3)
Respin Cycle
EpicRespin the Mystery Box to an equal or higher rarity.
Who's Keeping Score?
EpicDrops Double Points.
Free Fire
EpicNo ammo consumed for 60s.

Exit Strategy
EpicInstant exfil vote with fewer spawns.

Profit Sharing
EpicShare Essence with nearby players for 2 min.

Soda Fountain
EpicYour next perk buy grants +1 random perk.
Nowhere But There
EpicTeleport to a downed player and revive nearby.
Dead Drop
EpicIncreased salvage and equipment drops for 5 min. (Season 2)

Explosive Flourish
EpicEach reload triggers an explosion for 2 min. (Season 4)
Idle Eyes
LegendaryZombies idle for 30s.
Wall Power
LegendaryYour next wall-buy comes Pack-a-Punched.

Immolation Liquidation
LegendaryDrops a Fire Sale.
Phoenix Up
LegendaryRevive all downed players, perks kept.

On the House
LegendaryDrops a Random Perk power-up.

Wall To Wall Clearance
LegendaryWall-buys cost 10 Essence for 30s.

Crate Power
LegendaryYour next box gun comes Pack-a-Punched.

Modified Chaos
LegendaryReduced Ammo-Mod cooldowns for 2 min. (Season 2)

Support Group
LegendaryGrants an ARC-XD, Mangler Cannon, Sentry and Mutant Injection. (Season 3)

Flavor Hex
LegendaryGrants a random Ultra gum. (Season 4)
Perkaholic
UltraEvery perk on the map at once.

Wonderbar!
UltraYour next box spin is a Wonder Weapon.
Near Death Experience
UltraProximity revive with perks for 3 min.

Reign Drops
UltraDrops all core power-ups at once.

Hidden Power
UltraYour held weapon becomes Legendary rarity.

Time Out
UltraClear all enemies and end the round for 3 min. (Season 1)
Newtonian Negation · Indiegestion · Holiday Cheer · Quacknarok · Die Pitched · Rainburps · Jacked Lanterns
Whimsical7 cosmetic seasonal gums — flair only, no gameplay effect.
Field Upgrade reference (Black Ops 6)
Black Ops 6's 6 Field Upgrades — charged by kills. Each has 3 Major + 3 Minor augments (unlocked at Level 11); you equip one of each. All augment options are listed. Source: CoD Wiki + GameLeap/GameRant cross-check.
Energy Mine
A proximity energy explosion.

Healing Aura
Instant heal beams (also revives teammates in BO6/BO7).
Aether Shroud
Phase out of enemy detection.

Tesla Storm
Lightning links players, stunning and damaging enemies.

Frenzied Guard
Repair armour and taunt enemies; kills repair your armour.
Dark Flare
A penetrating shadow beam.
Dark Ops & mastery cards (Black Ops 6)
Global ‘Dark Ops’ challenge cards — hidden until completed, earnable on any map. Filter by category.
Another Round?
Dark OpsReach Round 100.
Reaper of the Undead
Dark OpsKill 1,000,000 zombies (lifetime cumulative).

Invincible
Dark OpsReach Round 30 without going down.

Social Distancing
Dark OpsReach Round 20 without taking damage.
Good Enough
Dark OpsReach Round 20 with your starting loadout only — no augments, perks, ammo mods or Field Upgrade.
Box Addict
Dark OpsBuy every Mystery Box weapon in a single game.

Gummed Up
Dark OpsConsume 25 GobbleGums in a single match.
Well That Was a Waste
Dark OpsGet downed within 10s of consuming Perkaholic.
Armed to the Teeth
Dark OpsHold 3 Pack-a-Punch-III Legendary weapons with ammo mods and 8 active perks.
Harbinger of Doom
Dark OpsKill 100 enemies with a single Scorestreak.
Sticks N' Stones
Dark OpsReach Round 25 solo using only melee / Combat Axes / Melee Macchiato.
Fatale
Dark OpsKill two Amalgams with a single shot.

Light 'Em Up
Dark OpsKill 10 ignited Elites using the Napalm Burst ‘Big Game’ augment.
Kunoichi
Dark OpsIn one Aether Shroud (Void Sheath), kill 3 standard + 2 Special + 1 Elite.

Zombies Dark Ops 100%
MasteryComplete 15 Dark Ops challenges.
Intel
30 collectibles, tracked under Barracks → Zombies Intel — 16 Audio Logs, 9 Documents and 5 Artifacts. The audio logs are fixed pickups (two need Nathan defeated first); documents come from island shovel-digs and shoot/explosive piles; the artifacts are mostly quest/boss-gated. Story/lore only.
Audio Logs 16
Code Words
Pack-a-Punch — terminal south of the central circle where Nathan's pod was. Needs Nathan defeated to reach.
Pleasing Results
On a blue barrel west of the Security Overlook, near Quick Revive.
Working Theory
Living Quarters — desk on the east wall between the two bunk beds (opposite Jugger-Nog).
Ship Manifest Destiny
Control Center — desk opposite Stamin-Up, before the stairs.
Food for Thought
Mess Hall — wooden desk on the north wall, by the GobbleGum machine.
Tougher Than She Looks
Holding Cells / Maglev elevator — on a wooden crate. Needs the three AMP Generators active.
The Hard Way
Interrogation Rooms — desk on the east wall (table with small monitors).
Surveyor Says
Temple Island — by the central rock staircase, next to the skeleton.
Red Tape
Sea Caves — on a pipe NE near the Tentacle Trap, before the Bio Lab.
Noble Purpose
Mining Tunnels — on a steel spool by the GobbleGum machine, past PhD Flopper.
Listen…
Sea Tower — on the railing of the central Aether Generator.
Numbers and Faces
Shipwreck (via Tactical Raft) — on a blue barrel at the front of the ship.
Doctor's Orders
Communications — middle desk row on the top floor (CRT monitors).
Damning Evidence
On a railing in the hole beneath the sunken Shipwreck, near the ladder. Needs Nathan defeated.
I Hope You're Watching
Seaside Path — at the base of a stone pillar, left of Deadshot Daiquiri.
Onboarding
Underground Bio Lab — on the medical table right of the Melee Macchiato machine.
Documents 9
Subject File #398
Shovel dig spot on Castle Rock Island (east).
Subject File #511
Shovel dig spot on Crab Island (south).
Subject File #272
Shovel dig spot on Crab Island (south).
Subject File #704
Shovel dig spot on Temple Island (west).
On the Horizon
On the floor beneath the Void Cannon barrels on the Gun Platform.
Uniquely Qualified
Guard Tower near Quick Revive — shoot it down with an explosive.
Last Minute Transfer
Mess Hall blue trash can — throw a frag or Semtex into it.
Innovative Technology
Sea Tower — shoot the papers on a server cabinet (NE side; power required).
What Have You Done?
Kill 10 fish with explosives at the Bio Lab docks after defeating Nathan (a fish drops it).
Artifacts 5
Limb Regrowth Specimen
Bio Lab — on a workstation below the central meeting room, above Melee Macchiato.
DRI-11 Beamsmasher
The Wonder Weapon — main-quest build, or the Mystery Box.
Hard Drive
Activate the Sea Caves Tentacle Trap and shoot the creature inside (needs the Beamsmasher).
Keycard
After defeating Nathan, dive into the water beneath him and grab it from the seafloor.
Talisman
Complete the Cursed Talisman side Easter egg (Sea Caves).
Common Terminus questions
Direct answers to the specific things players look up mid-game — part locations, puzzle steps and more.
Where are the three laptops on Terminus?
Activate three to start the guaranteed Beamsmasher build: laptop X below the Sea Tower on the docks side near Quick Revive, laptop Y up the side of the storage area just outside spawn below Stamin-Up, and laptop Z in Communications just past the Control Center. MrDalekJD does X first if one refuses to register.
How do the island orb rituals work on Terminus?
Raft to the marked island, place the multiphasic resonator under the floating blue orb, and kill the zombie that glows blue directly over the resonator so its essence deposits. Repeat for two or three glowing zombies, pick the resonator back up, then do the green and purple islands, and build the Beamsmasher at the Research Office.
How do the buoy and bomb timers work on Terminus?
Hack three satellite buoys by raft — a two-minute countdown starts after the first hack. Then defuse three bombs in the Bio Lab, each about fifteen seconds of held interact, within a five-minute limit. The bombs are a genuine fail state: run out and the map blows up, so be standing in the Bio Lab before you trigger it.
What is the Nathan tank code on Terminus?
Three digits, changing every game: digit 1 is the short hour hand of the clock read from the Interrogation rooms, digit 2 is the playing card pinned in the Mess Hall, and digit 3 is the days-since-last-injury safety sign in Engineering. Gear up before entering it — it triggers a lockdown with an elite Amalgam.
What is the Terminus song?
The song is 'Can You Hear Me? (Come In)' by Kevin Sherwood. Interact with three Mr. Peeks headsets — on the cable coil in Engineering, on the barrels by PhD Flopper in the Mines, and in the cabinet in the Bio Lab's third-level office.
How do you get the Cursed Talisman on Terminus?
Buy Melee Macchiato, melee the cracked treasure-map wall in the Sea Caves to reveal Captain Gregg, raft to the random X and dive for the Watch. Then burn the skeletons at Temple Island, Castle Rock and the Shipwreck for three Cursed Coins, return them, and stay on Crab Island three full rounds to open the Talisman chest.
How do you free the hard drive on Terminus?
Pack-a-Punch the Beamsmasher, find the tentacle trap with a Project Janus keycard lying on the ground under it, activate it, and fire the Beamsmasher's alt-fire beam along the trapped tentacles. A hard drive pops out — take it to Dr. Peck's box at the Guard Station in spawn.
Visual guides & sources
Screenshots and exact part locations live in these — open one on a second screen.