

Liberty Falls
The bright launch companion to Terminus — a sunny West Virginia town swallowed by the Dark Aether. Build the Thrustodyne M23 Jet Gun and the L.T.G., capture two HVT essences, calibrate three Projectors, then survive the S.D.G. shutdown in the Bye-Bye, Dark Aether main quest.
Quick answers
Liberty Falls is a bright, beginner-friendly Black Ops 6 Zombies map — a West Virginia town swallowed by the Dark Aether. Its 7-step main quest, 'Bye-Bye, Dark Aether', has you build the Thrustodyne M23 Jet Gun and the L.T.G., capture two HVT essences, calibrate three Projectors, then survive the S.D.G. shutdown finale. Rated Easy; 25–45 minutes, solo-capable.
Where is Pack-a-Punch on Liberty Falls?
Pack-a-Punch is inside the Hilltop Church at the top of the town. There is no power switch — buy through the doors up the hill and it is usable the moment you arrive, costing 5,000, 15,000 and 30,000 Essence for the three tiers.
What is the Wonder Weapon on Liberty Falls?
The Wonder Weapon is the Thrustodyne M23, the Jet Gun. Build it from three parts — the water pressure gauge, the handbrake and the electrical wires — at the bench in the Motor Lodge's hidden second-floor room.
Who is the boss of Liberty Falls?
The finale is the S.D.G. shutdown, a three-wave survival encounter ending with an elite Mangler and elite Abomination together. Clearing wave three downs the whole squad by design — do not quit during the wipe; wait for the cutscene and completion screen.
How do you calibrate the Projectors on Liberty Falls?
Read the Strauss Counter's colour, then set each Projector to the inverted colour: Counter green means set the Projector red, Counter red means set it green, and yellow stays yellow. There are three Projectors, and green and red always swap.
How long is the Liberty Falls Easter egg?
The Bye-Bye, Dark Aether main quest is 7 steps and takes roughly 25–45 minutes, rated Easy — the most beginner-friendly Easter egg in Black Ops 6. It is solo-capable for 1–4 players.
Map & Key areas
The map layout first, then the areas worth knowing by name. Map imagery © Activision, self-hosted.
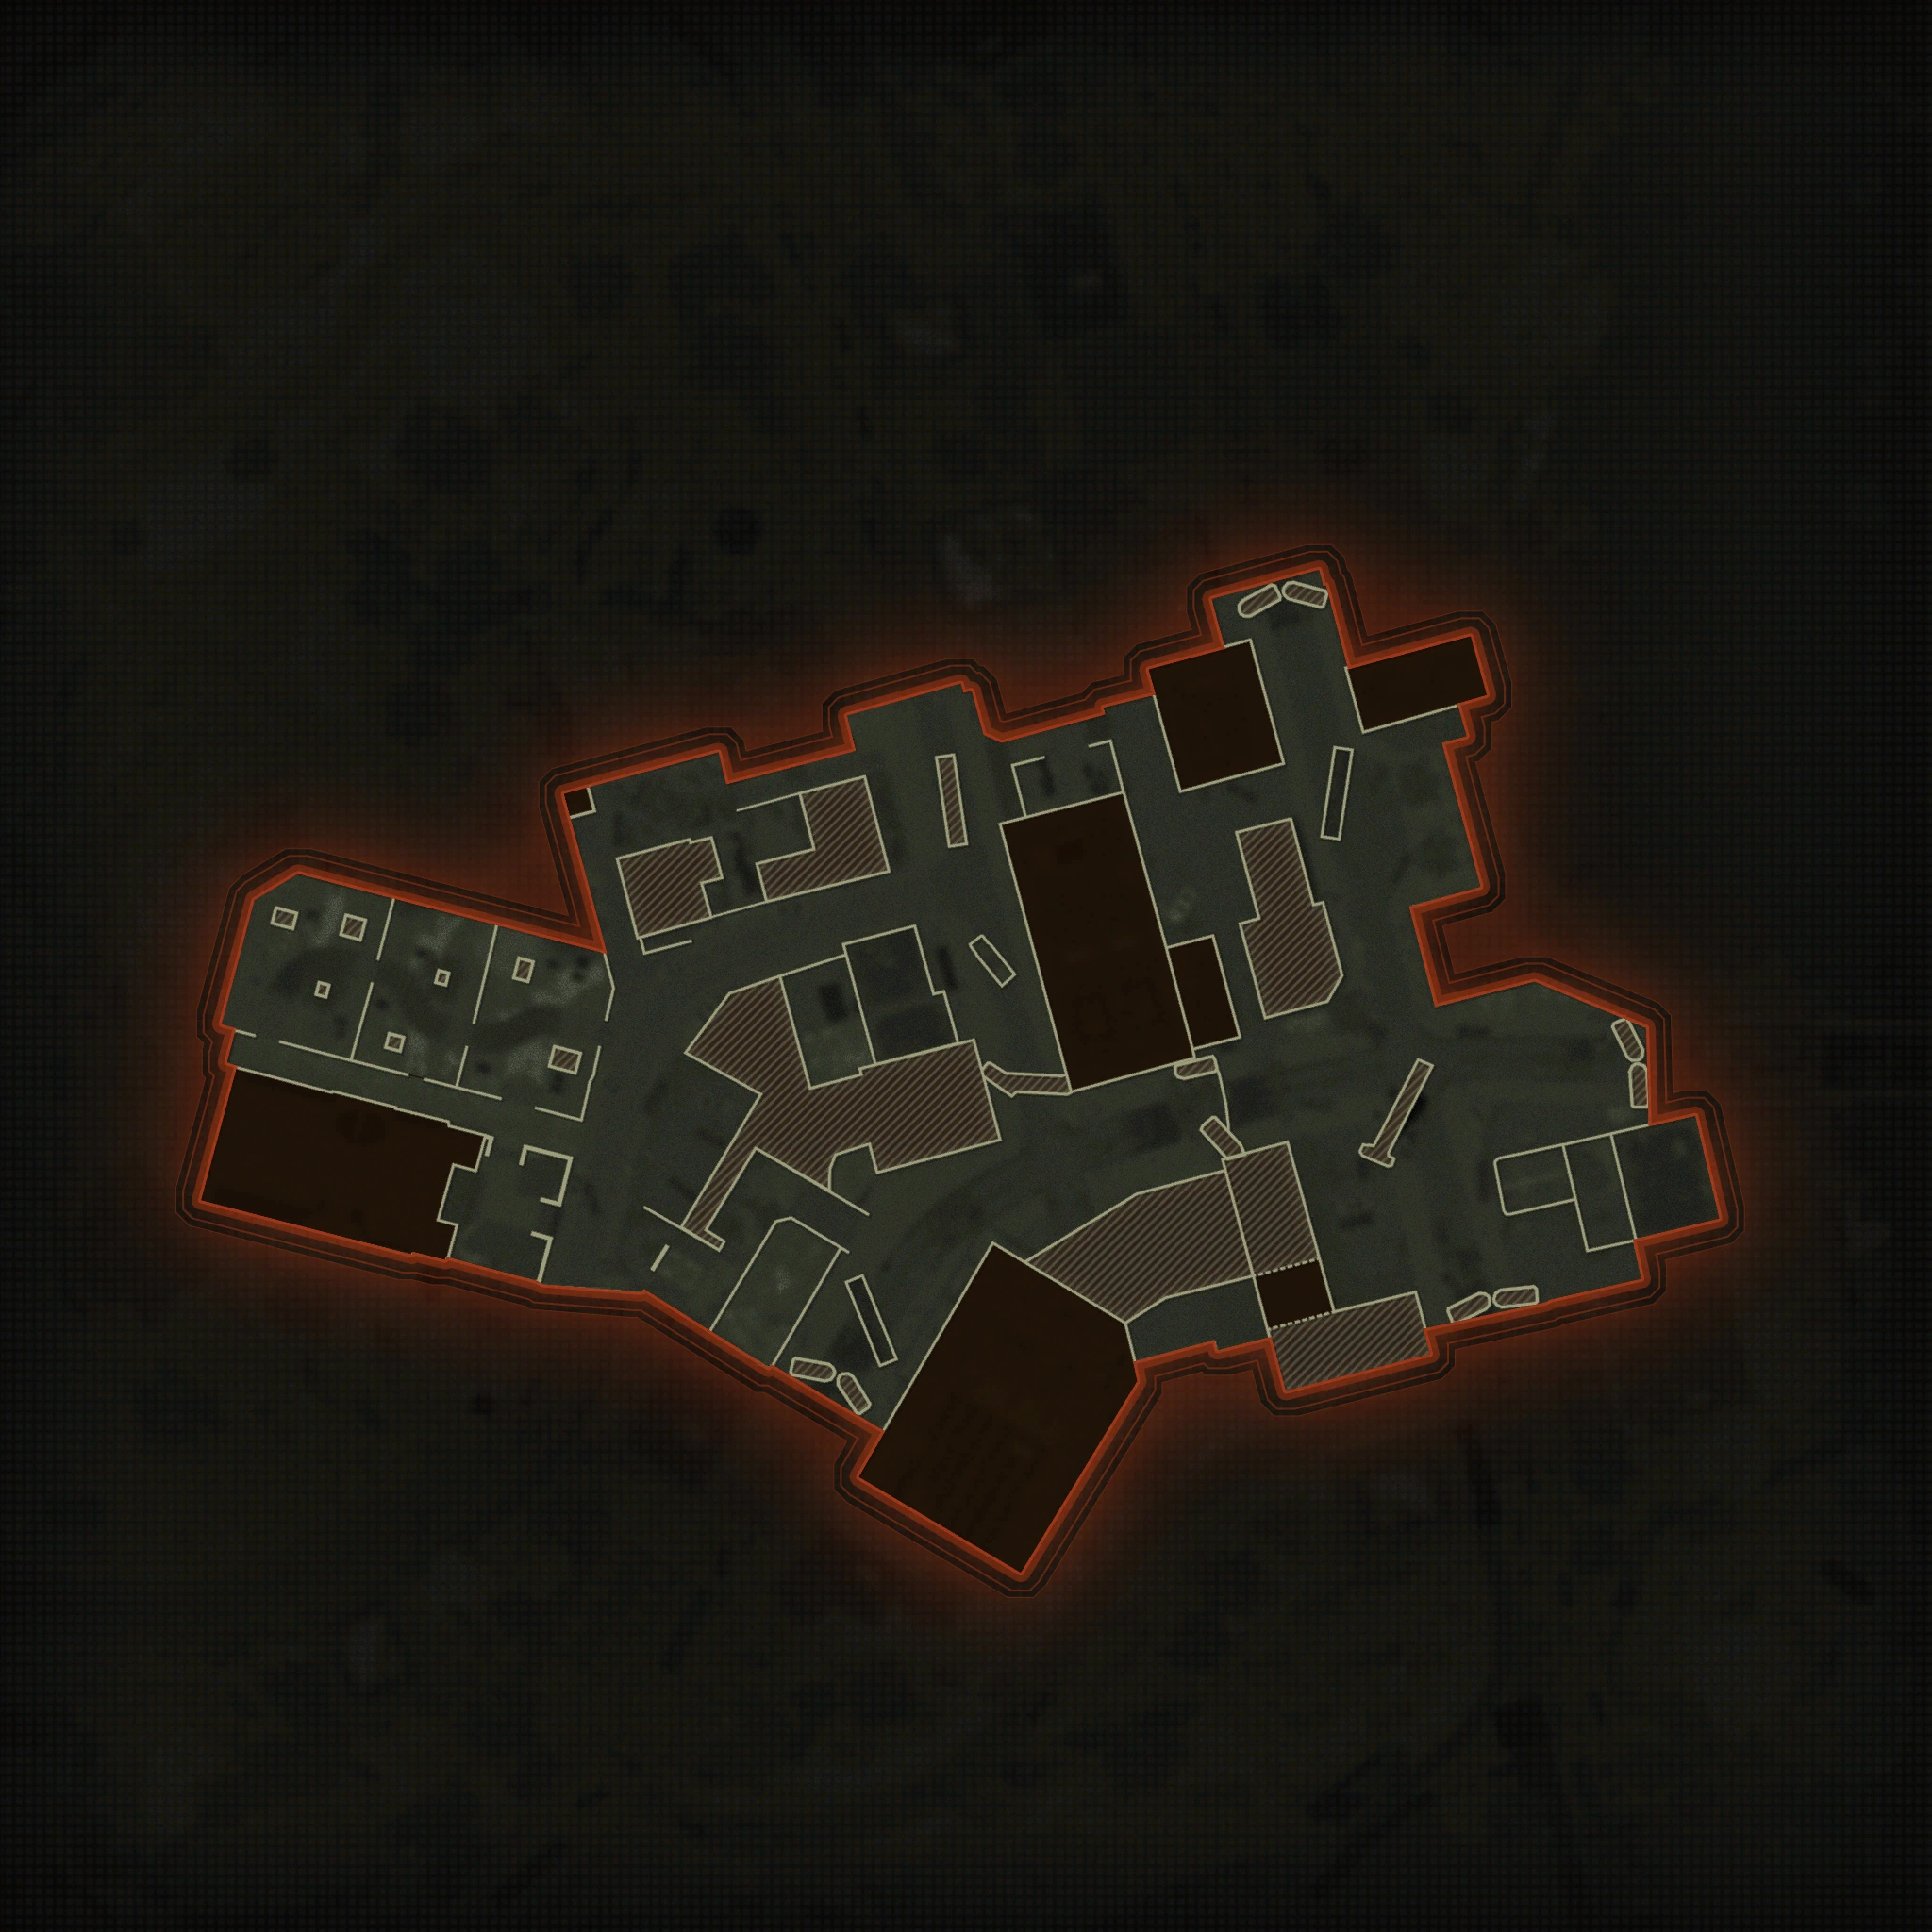
Pinch or double-tap to zoom in — the full map is a single image.
Pump and Pay / East Main Street
Spawn, first wall-buys, the Motor Lodge (Jet Gun bench, Room 202), an Aether Field Generator, and a bowling-shoe window.
Riverside
Olly’s Comics, the Radio House, the first L.T.G. storm cloud, Quick Revive, and the river route to the bank.
Washington Avenue
Buzz’s Cuts barber (an L.T.G. part), the flower-shop Water Valve, Stamin-Up, and the way up to the Cemetery.
West Main Street / Liberty Lanes
Fuller’s bowling alley (Water Gauge panel), the Savings & Loan bank entrance, one Projector, and the Hill Street Field Generator.
Savings and Loan / The Alamo
The vault, the rooftop L.T.G. workbench, the Yummy Freeze rooftop Projector, and zipline access.
Cemetery / Groundskeeper’s Yard
The Groundskeeper, the Toolshed (Handbrake), the second L.T.G. storm cloud, a Projector, and the church approach.
Forecourt / Dark Aether Church
Pack-a-Punch, the S.D.G. Generator, the floating L.T.G. part on Dr. Panos’ balcony, and the final encounter.
Steps at a glance
- Buy through from spawn up to the Hilltop Church → Pack-a-Punch
- Interact with the S.D.G. Generator twice to start the quest
- Build the Jet Gun — pressure gauge, handbrake, electrical wires
- Vacuum 3 L.T.G. parts → craft on the Alamo rooftop bench
- Stage an aether canister on a field trap (you can only walk with it)
- Place the L.T.G. under storm #1 → 60-second defence
- Weaken HVT #1 until it smokes purple → trap it → kill it
- Walk the canister back to the church within 1:30
- Take the Strauss Counter → calibrate 3 Projectors (green ↔ red inverted)
- Repeat the whole capture at storm #2
- Gear up: PaP II+, Tier 2–3 armour, injections and streaks crafted
- Start the S.D.G. shutdown → 3 waves → elite Mangler + Abomination
Full walkthrough
Open the map and start the quest
Buy through from spawn and work up the hill to the Hilltop Church. Pack-a-Punch sits inside and is usable the moment you arrive (5,000 / 15,000 / 30,000 Essence) — there is no power switch to find first. On the right-hand side of the church, interact with the machine’s side panel: every zombie in the map despawns and you get ghost dialogue from Dr. Panos.
Confirmation cue: you must interact a second time. The quest is only live once he says he is “patched into your signal” — one interaction is not enough, and this is the most common false start.
Tip: note the floating L.T.G. component high above the left-side balcony now. You cannot pull it until the Jet Gun is built.
Build the Thrustodyne M23 Jet Gun
Three parts, any order, then craft at the bench. Only one player needs to carry the Jet Gun for the suction steps. Once the build is unlocked it can also turn up from GobbleGums or the Mystery Box.
The build room: head to the Motor Lodge at spawn and run the second-floor walkway. A horde bursts out of a motel-room door, revealing the secret room with the bench.
Careful: that room is a one-way dead end. Clear whatever is chasing you before you go in, or you will be crafting with a train on your back and nowhere to rotate.
- Water Pressure Gauge — take the water valve from outside the flower shop on Washington Avenue / Hill Street, then in Liberty Lanes melee or shoot open the wall breaker panel, insert the valve and hold interact to drive the pressure to 100%. Zombies spawn endlessly while you hold it and progress only banks briefly, so expect several cycles solo: hold, train the horde away, run back, resume. The zombies despawn and the gauge pops out of the wall when it is done
- Handbrake — kill the Groundskeeper in the Cemetery, a unique marked zombie in a red shirt and dungarees whose spawn timing is random. He drops a golden tool shed key; use it on the shed in the Groundskeeper’s Yard off Hill Street
- Electrical Wires — you need a Mangler cannon (craft for 1,250 salvage, or shoot the arm-cannon off a Mangler from round 10 onward; a Mutant Injection blast also works). Charge-shot the gated door of the Radio House on Riverside, opposite Olly’s Comics, then hold interact on the trash piles — the wires are in one of four, and vermin jump out of them
Collect and build the L.T.G.
Use the Jet Gun’s suction to vacuum three L.T.G. (Limited Transdimensional Gateway) parts, in any order. If a part will not shift, release to cool the gun, back off a step and sweep the exact ceiling, window or ledge until it pulls free.
Confirmation cue: “that’s enough parts for the L.T.G.” Then take the zip line from the cemetery / church roof across to the Alamo bank rooftop and craft at the back-left workbench.
- Hilltop Church balcony — the floating part sits on the left side above the machine; interact with the machine once more first before you try to pull it
- Washington Avenue, by Speed Cola — get on the rooftop, jump across to the white van, then aim into the open window beneath the zip wire and suck the part out
- Olly’s Comics — above the middle counter, in the ceiling at the centre of the room
Capture the first HVT essence
There are two aether storms and two field traps, and you may do them in either order. The sequence below is identical for both captures.
- Stage the canister first. Take an aether canister from the church dark-aether device and drop it onto the field trap before you start anything else. Carrying a canister forces you to walk, so doing this first saves a punishing trek later.
- Place the L.T.G. under the mini lightning storm and survive a 60-second defence. Zombies that touch the portal drain its integrity; if it empties, the step fails and you retry next round.
- An HVT elite spawns when the timer ends — a super-Mangler at one storm, an Abomination at the other.
- Weaken it — do not kill it. The cue you are waiting for is purple smoke coming off it.
- Lure it onto the trap, activate the trap, and kill it while it is stunned. Its soul is drawn into the canister.
- Return the canister to the church dark-aether machine within 1:30 — walking pace, so clear the route before you trigger it.
After the first capture only: the machine’s side compartment opens. Take the Strauss Counter — it replaces your tactical.
Calibrate the three Projectors
Hold the tactical button to read the Counter’s colour — green, yellow or red. The signal strengthens as you close on a projector, so read it at point-blank range.
Co-op: every player carries their own Counter and takes one projector each.
Confirmation cue: a voice line plus purple beams from all three projectors converging on a canister at spawn. It charges up — carry it (walking) toward the church for the second capture, grabbing your L.T.G. on the way.
Needs confirming: whether individual projectors can be independently inverted on top of the rule above, and the third projector’s location — an earlier version of this guide named it the Yummy Freeze rooftop rather than the White House backyard.
- Hilltop stairs — on the grass below the church
- Behind the White House backyard — MrDalekJD’s route is bank roof, open the debris, then drop down
- Groundskeeper’s Yard, above Washington Avenue — MrRoflWaffles’ route is the right-side roof, zip to the bank rooftop, then the ledge
Capture the second HVT essence
Exactly the same sequence as step 4, at the other storm and the other trap: stage the charged canister on the trap, place the L.T.G., hold the 60-second defence, weaken the HVT until it smokes purple, trap and kill it, then walk the canister back to the church inside 1:30.
Tip: the two storms appear to have fixed HVT types — a super-Mangler at one and an Abomination at the other — so whichever you skipped first is the one you are fighting now. Bring the ammo for it.
Retry rule: a failed defence, or an HVT killed off the trap, is not fatal. Re-run it on a later round; do not leave the match.
Final S.D.G. shutdown encounter
Prep before you touch the machine: every perk you want, Pack-a-Punch II or better, armour tier 2–3, rarity upgraded, the Jet Gun in hand, Mutant Injections and score streaks crafted, and your gums ready. Activating the machine locks you inside the dark-aether church. In co-op all players must accept the vote. There is no time limit — survival beats rushing.
Wave 1: normal zombies plus a lot of Manglers. A full armour drop lands when it clears.
Wave 2: faster hordes plus an elite Mangler. Train the room clockwise or anticlockwise and focus the elite; you can Pack-a-Punch mid-fight with the points you earn here. Max Ammo on completion.
Wave 3: zombies, vermin, and an elite Mangler and elite Abomination together — the elite count scales with player count. This is where the Mutant Injections go; solo players should have saved them for exactly this.
Side Easter Eggs & extras
Everything beyond the main quest. Tap any entry to open the full how-and-where breakdown.
“Destroy Something Beautiful”
Kevin Sherwood ft. Cristina Scabbia. Interact with three Mr. Peeks (bunny-ear) headphones, any order, once per match: (1) Motor Lodge Alley — up the first set of stairs between the Motor Lodge and Liberty Lanes, turn right, on the ground; (2) Washington Avenue — under the bench at the top of the stairs up from the Grease Trap Patio; (3) Dark Aether Church — from the middle of the room turn left to the pew, next to the open book by Pack-a-Punch.
Deadshot Daiquiri — can-shooting challenge
Complete the long-range can-shooting challenge at the edge of town without a miss (use a scoped, accurate weapon) to earn a free Deadshot Daiquiri.
Savings & Loan vault
Read three 2-digit note fragments — the sticky note on the bank reception desk, the note under the beer bucket on the Liberty Lanes concession counter (shoot/melee the bucket), and the note on the upper-left inner shelf in Olly’s Comics. The randomised 6-digit code changes every match. Interact with the ajar vault door and pay 500 Essence to enter; inside, spend Loot Keys (dropped by Manglers/Abominations) on one safe-deposit box per visit for weapons, scorestreaks, perks and resources.
Aetherella transformation
With the Jet Gun, vacuum all nine Aetherella figures — four inside Olly’s Comics, plus one each at the East Main Motor Lodge, the Forecourt/church, the Washington Avenue flower shop, West Main Street/Liberty Lanes, and the Yummy Freeze rooftop. The ninth figure transforms the collector for ~90 seconds of invincibility with head-targeting eye lasers. A common boss strategy: take eight during setup and leave one easy figure to grab during the hardest S.D.G. phase (confirm it is still interactable before committing, as patches can change this).
Liberty Lanes bowling — “Strike!” Dark Ops
Shoot the Mr. Peeks bowling shoes in zombie windows at Pump and Pay, Hill Street, West Main Street, Cemetery and Riverside to teleport the team to an alternate Liberty Lanes. Charge and roll balls down zombie lanes; a score over 300 completes the Strike! Dark Ops challenge and higher scores improve the reward chest.
Optional secrets
Dancing Zombies (a rooftop interaction starts a dance party + safe reward); Raining Zombies (a correctly thrown explosive at the church-roof target rains bodies and loot); and hidden one-use Bonus Points, Max Ammo, Nuke and Full Power power-up targets dotted around town — best saved until needed.
Recommended loadouts
Three strong picks for this map — the map's Wonder Weapon plus reliable box/wall options. Each weapon lists a full recommended attachment build and the perks to pair with it, every perk shown with its Major and Minor augment. Push weapons to Legendary rarity and Pack-a-Punch; augment/attachment metas shift with balance patches, so treat these as a strong current baseline.
Jet Gun — Thrustodyne M23 (built, + L.T.G. quest)
Wonder Weapon / quest tool+Crafted at the Motor Lodge Room 202 bench from the Handbrake, Water Pressure Gauge and Electrical Wires. Suction pulls the L.T.G. and Aetherella parts; the overheating blast clears crowds. Keep it — it doubles as the Aetherella vacuum, so do not trade it away before both routes are done.
Attachments
- —Wonder Weapon — no Gunsmith attachments
Perks & augments
- Jugger-NogMajorReactive Armor — plate breaks stun nearby zombiesMinorDurable Plates — tougher armour
- Speed ColaMajorClassic Formula — even faster reloadsMinorQuick Swap — faster weapon swaps
- Stamin-UpMajorDasher — longer tactical sprintMinorHot Foot — speed burst on equipment kills
- Elemental PopMajorElectric Cherry — shock burst on reloadMinorChill Berry — faster Ammo-Mod cooldowns
- PhD FlopperMajorPhD Slider — slide into a group to detonateMinorTribologist — longer, faster slides
- Quick ReviveMajorDying Wish — brief invulnerability on lethal hitsMinorSlow Death — longer last-stand timer
The Jet Gun overheats — vent it between waves so you can keep clearing crowds; it is also the Aetherella vacuum, so never trade it.
GPR 91 (Legendary · PaP III)
Boss weak-point DPS+The GPR 91 (or the box's best AR) maxed to Legendary and Pack-a-Punch III with Deadshot is what actually kills the Abomination — keep clean line of sight on the glowing mouths. Rarity and PaP tiers stack, so a high-rarity Tier III gun out-damages an un-upgraded Wonder Weapon.
Attachments
- OpticVolzhskiy Reflex
- MuzzleSuppressor
- BarrelCHF Barrel
- UnderbarrelVertical Foregrip
- MagazineExtended Mag I
- Fire ModsRapid Fire
- Rear GripQuickdraw Grip
- StockInfiltrator Stock
Perks & augments
- Jugger-NogMajorReactive Armor — plate breaks stun nearby zombiesMinorDurable Plates — tougher armour
- Speed ColaMajorClassic Formula — even faster reloadsMinorQuick Swap — faster weapon swaps
- Deadshot DaiquiriMajorDead Again — crits can add a bullet to the magMinorDead Break — extra armour damage
- Stamin-UpMajorStalker — faster movement while aimingMinorHot Foot — speed burst on equipment kills
- PhD FlopperMajorPhD Slider — slide into a group to detonateMinorTribologist — longer, faster slides
- Death PerceptionMajorDeath Stare — chance to instantly drop wounded specialsMinorBird's-Eye View — faster minimap scan
CHF Barrel + Deadshot Daiquiri turn every mouth hit into a crit.
ASG-89 (Pack-a-Punch + high rarity)
Crowd clear for the L.T.G. defences+A dependable auto shotgun for the Riverside and Cemetery holdouts and the packed S.D.G. waves — Pack-a-Punch and rarity it up, add Brain Rot or Napalm Burst, and run a Suppressor early for extra Salvage.
Attachments
- OpticKepler Microflex (or iron sights)
- MuzzleSuppressor
- BarrelCHF Barrel
- UnderbarrelRanger Foregrip
- MagazineExtended Mag II
- Fire ModsRapid Fire
- StockLight Stock
Perks & augments
- Jugger-NogMajorReactive Armor — plate breaks stun nearby zombiesMinorDurable Plates — tougher armour
- Speed ColaMajorClassic Formula — even faster reloadsMinorQuick Swap — faster weapon swaps
- Deadshot DaiquiriMajorDead Again — crits can add a bullet to the magMinorDead Break — extra armour damage
- Stamin-UpMajorDasher — longer tactical sprintMinorHot Foot — speed burst on equipment kills
- PhD FlopperMajorPhD Slider — slide into a group to detonateMinorTribologist — longer, faster slides
- Quick ReviveMajorDying Wish — brief invulnerability on lethal hitsMinorSlow Death — longer last-stand timer
Brain Rot turns a zombie into an ally to hold the S.D.G. lanes while you reload.
Recommended kit & gum picks
The recommended kit for this quest — Field Upgrade, Ammo Mods, equipment and the GobbleGums to bring, split by solo and co-op. Weapons are in Recommended loadouts above. Metas shift with balance patches, so treat these as a strong current baseline.

Aether Shroud
Vanish to reset the L.T.G. defences, trap the HVTs and cover the timed canister returns.

Energy Mine
A placed blast for the packed S.D.G. shutdown waves if you prefer clear to stealth.

Brain Rot
Turns a zombie into an ally to guard a lane while you reload during the shutdown.

Napalm Burst
Burning rounds shred the Abomination's glowing mouths.

Dead Wire
Chain lightning to stun and strip Manglers and the HVTs.
Frag Grenade
Reliable cook-and-throw clear for the church and cemetery holds.

Monkey Bomb
Distraction bait during the L.T.G. defences and the canister returns.

Perkaholic
UltraEvery perk on the map at once.

Phoenix Up
LegendaryRevive with all perks kept — solo insurance.

Wall Power
LegendaryNext wall-buy comes Pack-a-Punched.

Dead Drop
EpicMore salvage and equipment for ~5 min.

Free Fire
EpicNo ammo consumed for 60s — a free window on the Abomination.

Shields Up
RareRefills armour at 2× strength for 3 min — the gum both creators bring on every map, and blue rarity so you will actually have it.
Perkaholic
UltraFull perks for whoever pops it.

Nowhere But There
EpicTeleport to a downed team-mate and revive nearby — key on the split L.T.G. defences.
Free Fire
EpicNo ammo for 60s on the boss.

Temporal Gift
RareExtends your next timed power-up for the team.
Dead Drop
EpicSalvage and equipment for the whole squad.
Per-map augments
The Major + Minor augment to run on each core perk for this quest. BO6 gives 3 Major and 3 Minor options per perk — pick one of each; these are tuned to this map's boss and steps. Augments unlock at Level 11; metas shift with patches, so treat as a strong baseline. Per-map augment recs are ground no competitor covers.
 Reactive ArmorMinor
 Durable Plates
 Phantom ReloadMinor
 Quick Swap
 Dead AgainMinor
 Dead Break
 DasherMinor
 Hot Foot
 PhD SliderMinor
 Tribologist
 Dying WishMinor
 Slow Death
Calling cards on this map
Cosmetic calling cards you can earn on this map. ⏳ marks time-limited main-Easter-Egg cards — miss the window and they're gone for good. Global Dark Ops challenge cards are in the reference section below.

Liberated
Map challengeComplete the Liberty Falls quest in under 30 minutes in Standard Mode.

Strike!
Map challengeScore 300 while bowling at Liberty Falls.

Main-quest completion card
Main EEComplete the Liberty Falls main quest (also unlocks the Ray Gun PJ-SRU weapon skin).
Exact card name not yet confirmed.
⏳ Time-limited — only awarded if you finish before Directed Mode is added for this map; permanently missable afterwards.
GobbleGum reference — Black Ops 6
All 41 Black Ops 6 GobbleGums by rarity — Rare, Epic, Legendary, Ultra and the cosmetic Whimsicals. They drop at end-of-round and you hold up to three. Filter by rarity.

Kill Joy
RareDrops an Insta-Kill.

Cache Back
RareDrops a Max Ammo.
Temporal Gift
RareYour next timed power-up lasts longer.

Stock Option
RareAmmo drawn from your stockpile for 60s.

Anywhere But Here
RareRandom teleport plus a concussive blast.

Arsenal Accelerator
RareFaster Field-Upgrade charge for 5 min.
Shields Up
RareRefill armour at 2× strength for 3 min.

Power Keg
RareDrops a Full Power power-up. (Season 1)

Tactical Diffusion
RareNext Nuke is disabled and pays +2,000 Essence. (Season 3)

Respin Cycle
EpicRespin the Mystery Box to an equal or higher rarity.

Who's Keeping Score?
EpicDrops Double Points.
Free Fire
EpicNo ammo consumed for 60s.

Exit Strategy
EpicInstant exfil vote with fewer spawns.

Profit Sharing
EpicShare Essence with nearby players for 2 min.

Soda Fountain
EpicYour next perk buy grants +1 random perk.
Nowhere But There
EpicTeleport to a downed player and revive nearby.
Dead Drop
EpicIncreased salvage and equipment drops for 5 min. (Season 2)

Explosive Flourish
EpicEach reload triggers an explosion for 2 min. (Season 4)

Idle Eyes
LegendaryZombies idle for 30s.
Wall Power
LegendaryYour next wall-buy comes Pack-a-Punched.

Immolation Liquidation
LegendaryDrops a Fire Sale.
Phoenix Up
LegendaryRevive all downed players, perks kept.

On the House
LegendaryDrops a Random Perk power-up.

Wall To Wall Clearance
LegendaryWall-buys cost 10 Essence for 30s.

Crate Power
LegendaryYour next box gun comes Pack-a-Punched.

Modified Chaos
LegendaryReduced Ammo-Mod cooldowns for 2 min. (Season 2)

Support Group
LegendaryGrants an ARC-XD, Mangler Cannon, Sentry and Mutant Injection. (Season 3)

Flavor Hex
LegendaryGrants a random Ultra gum. (Season 4)
Perkaholic
UltraEvery perk on the map at once.

Wonderbar!
UltraYour next box spin is a Wonder Weapon.

Near Death Experience
UltraProximity revive with perks for 3 min.

Reign Drops
UltraDrops all core power-ups at once.

Hidden Power
UltraYour held weapon becomes Legendary rarity.

Time Out
UltraClear all enemies and end the round for 3 min. (Season 1)
Newtonian Negation · Indiegestion · Holiday Cheer · Quacknarok · Die Pitched · Rainburps · Jacked Lanterns
Whimsical7 cosmetic seasonal gums — flair only, no gameplay effect.
Field Upgrade reference (Black Ops 6)
Black Ops 6's 6 Field Upgrades — charged by kills. Each has 3 Major + 3 Minor augments (unlocked at Level 11); you equip one of each. All augment options are listed. Source: CoD Wiki + GameLeap/GameRant cross-check.
Energy Mine
A proximity energy explosion.

Healing Aura
Instant heal beams (also revives teammates in BO6/BO7).
Aether Shroud
Phase out of enemy detection.

Tesla Storm
Lightning links players, stunning and damaging enemies.

Frenzied Guard
Repair armour and taunt enemies; kills repair your armour.
Dark Flare
A penetrating shadow beam.
Dark Ops & mastery cards (Black Ops 6)
Global ‘Dark Ops’ challenge cards — hidden until completed, earnable on any map. Filter by category.

Another Round?
Dark OpsReach Round 100.

Reaper of the Undead
Dark OpsKill 1,000,000 zombies (lifetime cumulative).

Invincible
Dark OpsReach Round 30 without going down.

Social Distancing
Dark OpsReach Round 20 without taking damage.

Good Enough
Dark OpsReach Round 20 with your starting loadout only — no augments, perks, ammo mods or Field Upgrade.
Box Addict
Dark OpsBuy every Mystery Box weapon in a single game.

Gummed Up
Dark OpsConsume 25 GobbleGums in a single match.

Well That Was a Waste
Dark OpsGet downed within 10s of consuming Perkaholic.

Armed to the Teeth
Dark OpsHold 3 Pack-a-Punch-III Legendary weapons with ammo mods and 8 active perks.

Harbinger of Doom
Dark OpsKill 100 enemies with a single Scorestreak.

Sticks N' Stones
Dark OpsReach Round 25 solo using only melee / Combat Axes / Melee Macchiato.

Fatale
Dark OpsKill two Amalgams with a single shot.

Light 'Em Up
Dark OpsKill 10 ignited Elites using the Napalm Burst ‘Big Game’ augment.

Kunoichi
Dark OpsIn one Aether Shroud (Void Sheath), kill 3 standard + 2 Special + 1 Elite.

Zombies Dark Ops 100%
MasteryComplete 15 Dark Ops challenges.
Intel
18 collectibles, tracked under Barracks → Zombies Intel — 9 Audio Logs, 4 Documents and 5 Artifacts. Most audio logs are simple pickups; the documents and artifacts lean on the map's mini Easter eggs (Mr. Peeks, Aetherella, the bank vault). Story/lore only, no gameplay reward.
Audio Logs 9
Quantum Mechanical Failure
Olly's Comics — by the storefront display window (Riverside).
Conspiracy Theorist
Washington Avenue — on the café table left of the Speed Cola machine.
The House that Josiah Built
Cemetery — on the back wall near the Level 3 Armor wall-buy (behind the tomb).
The Scientist and The Moonshiner
Motor Lodge — upstairs room with the Jet Gun workbench (Room 202).
Steel Mountain Rescue
West Main Street — by the bench behind the bus, outside Fuller's Liberty Lanes.
Bear Witness
Dark Aether Church — on a pew beside the flowers, left of the entrance near Melee Macchiato.
One Lit Match
Groundskeeper's Yard — on the woodpile behind the house. Needs the SDG generator active (main-quest step).
Money Talks
Savings & Loans Bank — vault floor, left corner. Open the vault first (three code notes).
Limited Run
Olly's Comics — SW counter by the ice-cream-parlor door. Needs the Aetherella figurine Easter egg done.
Documents 4
We Only Take Cash
Olly's Comics parking lot — destroy the black car with the gold stripe using the Mangler Cannon (Mr. Peeks car egg).
Politics, Politics
Bank vault lockbox — open it with a Loot Key dropped by an elite zombie.
Fine Man
Fast Forward video store (Riverside back alley) — shoot the three tapes on the shelf through the window.
Final Issue
Olly's Comics — hold-interact the white cardboard comic boxes (random box).
Artifacts 5
Thrustodyne Model 23 (Jet Gun)
Build the Wonder Weapon (parts + the Motor Lodge workbench, or the Mystery Box).
Transdimensional Gateway Device
Collect three parts and assemble them at the Savings & Loans rooftop crafting station.
Aetherella Statue
Complete the Aetherella figurine Easter egg — shoot the hidden figurines around the map with the Jet Gun.
Aetheric Bowling Ball
Score 300+ in the Mr. Peeks bowling egg at Fuller's Liberty Lanes (2-minute timer).
Mr. Peeks' Misplaced Bowling Shoes
Shoot any one of the five shoe pairs (Pump & Pay register, Riverside store shelf, the Hill Street house, the Cemetery tree, or a casket in Benson's Burial Services).
Common Liberty Falls questions
Direct answers to the specific things players look up mid-game — part locations, puzzle steps and more.
Where are the Jet Gun parts on Liberty Falls?
Three parts, built at the Motor Lodge bench. The water pressure gauge needs the flower-shop valve driven to 100% at the Liberty Lanes breaker panel; the handbrake comes from the Groundskeeper's tool shed (kill the red-shirted Groundskeeper in the Cemetery for the key); and the electrical wires are in the Radio House trash piles, opened with a Mangler cannon charge-shot.
Where are the L.T.G. parts on Liberty Falls?
Vacuum three with the Jet Gun's suction, then craft on the Alamo bank rooftop: one on the Hilltop Church balcony above the machine, one on Washington Avenue by Speed Cola (jump to the white van and aim into the open window), and one in Olly's Comics ceiling above the middle counter.
How do you open the Savings and Loan vault on Liberty Falls?
Read three two-digit note fragments — the sticky note on the bank reception desk, the note under the Liberty Lanes beer bucket, and the one on Olly's Comics' upper-left shelf. The six-digit code randomises each match. Enter the ajar vault, pay 500 Essence, and spend Loot Keys (from Manglers and Abominations) on the safe-deposit boxes.
How do you capture the HVT essence on Liberty Falls?
Stage an aether canister from the church onto a field trap first, since carrying it forces you to walk. Place the L.T.G. under the storm and survive a 60-second defence, then weaken the HVT — a super-Mangler or Abomination — until it smokes purple, lure it onto the trap, kill it, and return the canister to the church within 1:30.
What is the Liberty Falls song?
The song is 'Destroy Something Beautiful' by Kevin Sherwood featuring Cristina Scabbia. Interact with three Mr. Peeks bunny-ear headphones — in the Motor Lodge alley, under the bench at the top of the Washington Avenue stairs, and by the pew next to Pack-a-Punch in the Dark Aether Church.
How do you become Aetherella on Liberty Falls?
With the Jet Gun, vacuum all nine Aetherella figures — four inside Olly's Comics plus one each at the Motor Lodge, the church, the Washington Avenue flower shop, Liberty Lanes and the Yummy Freeze rooftop. The ninth turns the collector into Aetherella for about 90 seconds of invincibility with head-targeting eye lasers.
How do you get free Deadshot Daiquiri on Liberty Falls?
Complete the long-range can-shooting challenge at the edge of town without a single miss — use a scoped, accurate weapon — and it awards a free Deadshot Daiquiri.
Visual guides & sources
Screenshots and exact part locations live in these — open one on a second screen.