
Zetsubou No Shima
A Pacific island hiding a Division 9 bio-lab that dosed plants, animals and men with Element 115. Grow the KT-4, cleanse the Skull of Nan Sapwe, and free the original Takeo from a monstrous plant-Thrasher.
Map & Key areas
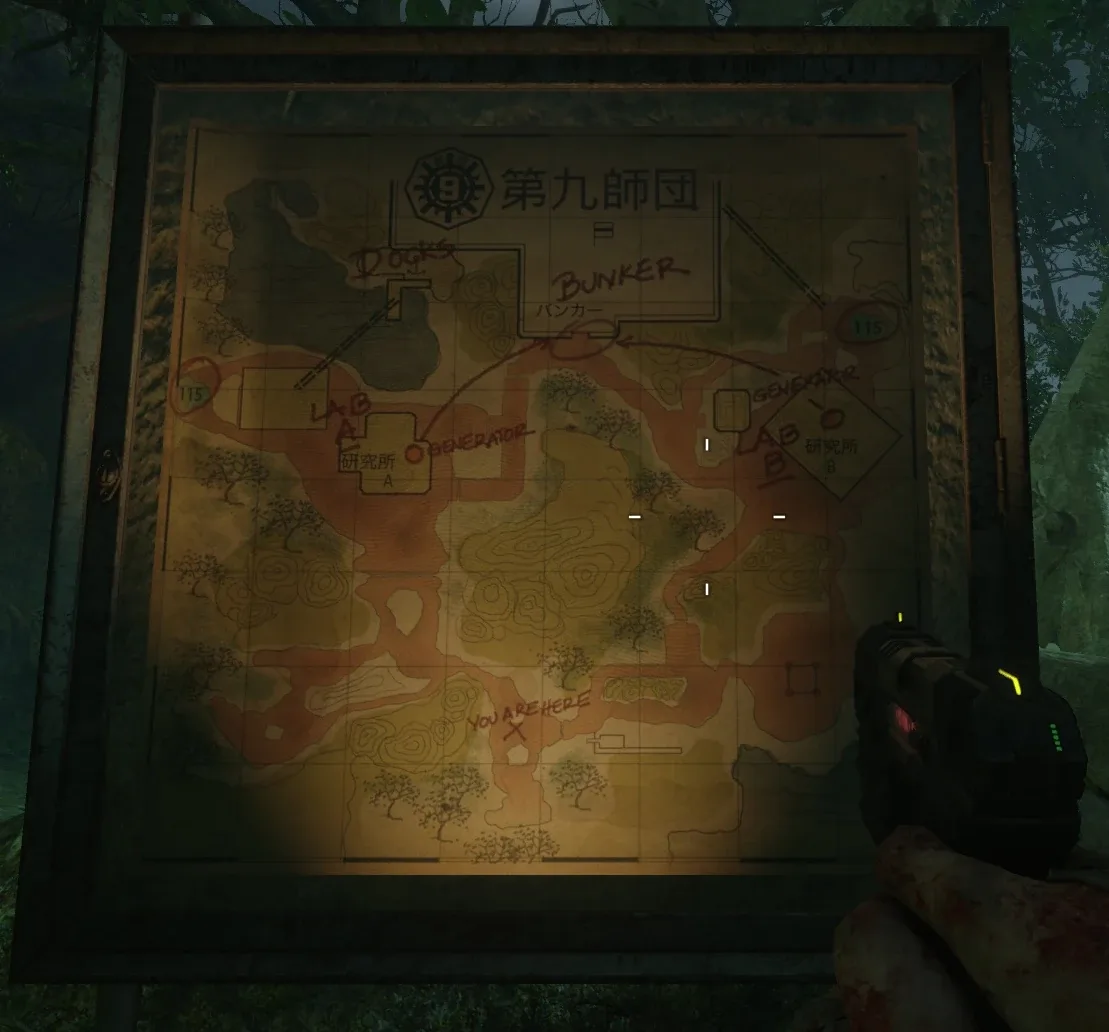
The map layout first, then the areas worth knowing by name. Map imagery © Activision, self-hosted.
Spawn / Lab A
Blue irradiated pool, a generator, the water Bucket, Speed Cola and the spider-cage terminal.
Lab B
Second lab with its own generator, green water, an electric panel and upper rooms.
The Bunker
Underground Division 9 facility — power switch, flooded sections, the workbench and sewers.
Operations Room / PaP
Drained by repairing three valves — the skull altar and Pack-a-Punch.
Underwater caves
Past Mule Kick — shoot orange spores for oxygen; holds the KT-4 plant part.
Spider Lair / AA Platform
Web-sealed spider den (opened with the KT-4) and the anti-aircraft gun.
Steps at a glance
- Fill the generators + bunker Power Room for power
- Build the Zombie Shield
- Build the Gas Mask
- Repair 3 valves → Pack-a-Punch
- Grow/gather 3 parts → the KT-4
- Cleanse the 4 skulls → Skull of Nan Sapwe
- Complete the ritual trials → altar lightning
- Upgrade the KT-4 → Masamune
- Collect the 3 cogs
- Repair the elevator, descend
- Destroy the Thrasher's 4 arms
Full walkthrough
Power on
Grab the water Bucket at spawn, fill it from Lab A's blue pool and pour it into Lab A's generator; repeat at Lab B. Enter the bunker Power Room, swim to clear the webbed fan, survive the lockdown and flip the main switch.
Build the Zombie Shield
Three parts — around Lab A (by the 115 canister/Kuda wall-buy), the Lab B tree area, and the upper AA Platform by the Mystery Box. Craft at a lab workbench. The shield later catches lightning to electrify panels.
Build the Gas Mask
Collect the cable (plane crash by the Propeller Trap), the mask (Lab B rear, by the green water) and the filter (Docks past the Power Room); craft at a lab bench. Required for the underwater sections.
Repair the valves → PaP
Collect three drain parts from the flooded areas — the flooded turbine room, the purple-water cocoon chamber, and the submerged cave/body-bag route — and fit them to the three valves around the chamber to drain it; Pack-a-Punch unlocks.
Build the KT-4
Three parts, then craft at the workbench:
- Spider venom — on a Spider round, use Lab A's cage terminal to trap a spider, then take the extracted canister
- Green vial — kill a random green-glowing zombie in the Lab B area
- Red plant — past Mule Kick, dive the underwater cave (shoot spores for air) and pick the plant at the dead end
Cleanse the 4 skulls
Read each skull's symbol, carry it to the matching altar (spawn, plane wreckage, Docks, Operations Room) and defend until cleansed. A cave then opens beneath the central altar — survive the Keepers to claim the Skull of Nan Sapwe (a scan/melee tool).
Ritual trials → lightning
Complete your 3 randomised trials (eat fruit, grab power-ups, water plants, kill spore zombies, etc. — solo does 3, co-op does everyone's). Non-lethal lightning then strikes the altar every ~2 minutes — catch it on your Zombie Shield for an electrified shield.
Upgrade to the Masamune
Three parts: a rainbow plant — plant a seed and water it with Rainbow Water once a round for three rounds (get Rainbow Water from the sewer-pipe fast-travel: spam interact on the right side as you're pulled through); a vial from Lab B's electric cage (strike the panel with the charged shield — in co-op a second player must re-electrify the Lab B cage panel to raise/lower the vial collector); and a spider fang (burn the webs by Speed Cola with the KT-4 and beat the giant spider). Craft the Masamune.
Collect the 3 cogs
Cog 1 requires the Anywhere But Here! GobbleGum — without it in your pack the quest cannot be completed and you must restart, so equip it before you begin. Stand in the sealed bunker chamber below Lab A and use the gum to teleport into the secret room above Lab A, then grab the cog before the one-way exit. Cog 2: electrify Lab A's zipline panel, then ride the zipline up from the Docks toward Lab A and melee immediately to drop onto the small dock (the safer route). Cog 3: grow a Flak Shell on Blue water — a chance drop (shoot the blue-water plant with the KT-4 once a round for three rounds; grow two plants in parallel to hedge) — load the AA gun, shoot a passing plane and grab the smoking cog (it can land at one of three smoking spots).
Repair the elevator
With the Skull of Nan Sapwe, mesmerise (scan) two hidden spots: the half-poster left of the purple water in the Living Quarters / body-bag room to reveal its other half, and the wall right of the bunker entrance (left of the yellow danger sign) to open the hidden generator room holding the broken elevator machinery. Place all three cogs in that machinery and ride the elevator down — clear the vines in the shaft with the KT-4.
Defeat the Thrasher
Shoot an arm's spore with the Masamune to wake the caged Giant Thrasher (the mutated Takeo). Survive constant Spiders and Thrashers, and destroy each arm only when its spore glows orange. All four arms down ends the quest.
Side Easter Eggs & extras
Everything beyond the main quest. Tap any entry to open the full how-and-where breakdown.
“Dead Flowers”
Kevin Sherwood ft. Malukah. Interact with the 3 plush toys: Lab A (on a generator left of the blue pool), Lab B upper floor (small top room), and the bunker Test Subjects area (table beneath the flooded section).
- Interact with 3 plush toys, in any order (a space-age chime confirms each)
- Lab A — on a small generator to the left of the blue irradiated pool
- Lab B upper floor — on a table in the small top-floor room before the broken-ladder balcony
- Bunker Test Subjects area — on a table beneath the flooded section, far-left (needs power in both labs)
- 'Dead Flowers' by Kevin Sherwood ft. Malukah plays
“Samantha's Lullaby” (melody bulbs)
Fill the row of purple-water bulbs underground in the sequence 1-3-5-6-7-5, then activate the play bulb. (Sequence widely reported but treat as approximate.)
- Fill your bucket with Purple 115 water (underground bunker cocoon room)
- Go to the wall of 7 glowing bulbs beside the purple pool; number them 1-7
- Pour purple water into the note bulbs in order: 1, 3, 5, 6, 7, 5 (a mistake resets the row)
- Interact with the activation bulb to play the Samantha's Lullaby mix
- (The exact 1-3-5-6-7-5 order is widely reported but single-sourced)
KT-4 → Masamune
The map's plant-based acid Wonder Weapon — built from three parts and upgraded to the Masamune, the only reliable way to kill the boss's arms.
- KT-4 bench is in the underground formula room near Mule Kick (past Pack-a-Punch)
- KT-4 part 1: on a spider round in Lab A, lure a giant spider into the purple goo via the cage, then take the container
- KT-4 part 2: from ~round 8, kill a green-glowing zombie (around Lab B) for the test tube
- KT-4 part 3: swim the flooded passage by Mule Kick to the blue-crystal dead end for the red plant; build at the bench
- Masamune: clear the Lab A cobwebs with a charged KT-4, beat the Giant Spider and loot it; take a vial from Lab B's electric chamber; grow a Masamune plant on Rainbow water
- Craft the Masamune at the upgrade machine beside the KT-4 bench
Skull of Nan Sapwe
Cleanse the four altar skulls and beat the Keepers to earn the skull — a scanner and melee tool used to reveal hidden walls.
- Take a skull from the hilltop altar's four pillars — an Apothicon symbol appears on it; memorise it
- Carry it to the cleansing pedestal bearing the matching symbol (near spawn, the docks, the plane wreck, and the lower Communications area)
- Place it and defend it through the event (skull 1 zombies, 2 adds spiders, 3 Thrashers, 4 all types)
- Cleanse all four to crumble the central altar and open an underground chamber
- Kill the Keeper phantoms to charge the weapon, then collect the Skull of Nan Sapwe
- Use: Vaporize (levitate & explode) and Mesmerize (hold enemies); its blast also reveals hidden walls for later steps
Perk fruit plants
Grow perk fruit in a pod and eat it for a random free perk (Enhanced Fruit improves the odds).
- Pick up a seed (blue power-up drop) and plant it in a mud planter
- Water it once per round for three rounds — for perk fruit, use Blue, Green and Purple water across the three rounds (no fertiliser)
- When mature, eat the fruit for a random free perk
- Only eat with an empty perk slot — a full loadout makes you vomit and wastes it
- Enhanced: also fertilise with the KT-4/Masamune after each watering to raise the perk odds
Seed & water growing
Plant Seeds and water with Blue/Green/Purple/Rainbow (fertilise with the KT-4) to grow loot pods, weapons, Cymbal Monkeys, an Empty Perk Bottle and more.
- Seeds drop from zombies (blue power-ups); plant them in mud planters (some hidden ones need the Skull of Nan Sapwe to reveal)
- Fill a bucket at a water tap and pour on the seed once per round for three rounds
- Taps: Blue (Lab A spider-pond), Green (behind Lab B by the sewer exit), Purple (bunker cocoon room); Rainbow needs a tight 115-rock interaction with the Gold Bucket
- Outcomes: Blue×3 = loot pod, Green×3 = a plant that pins a zombie, Purple×3 = a carnivorous plant, all three mains = best perk fruit, Rainbow×3 = the Masamune plant
- Fertilising with the KT-4/Masamune after each watering boosts the reward and enables the enhanced options
Giant Spider — free Widow's Wine
Burn the web by Speed Cola with the KT-4, beat the giant spider and finish the cave interaction for a free Widow's Wine (the same fight yields the Masamune fang).
Imprint plant
Grow the right plant to store a player's weapons, perks and state — after death you respawn from the plant with your loadout intact.
Golden Bucket
Complete the long plant/water interaction chain to upgrade the water bucket so it holds every water type for repeated use.
Spider Bait & Friendly Thrasher
Complete the cocoon/transformation steps to temporarily play as a Spider, or grow the right mutation and feed a zombie to spawn a temporary allied Thrasher — both optional.
Doppelganger scare
Use the Skull of Nan Sapwe on the hidden portrait trigger to reveal the character-double jump-scare.
Recommended loadouts
Three strong picks for this map — the map's Wonder Weapon plus reliable box/wall options. These are pre-augment-era games, so the setup is the gun plus Pack-a-Punch and perk synergy.
KT-4 → Masamune
Wonder Weapon & boss DPSThe map's plant acid gun — the Masamune's orange-spore shots are the only reliable way to kill the boss arms. Pair with Double Tap II and Widow's Wine.
Drakon (PaP)
Headshot farmingHigh single-shot headshot damage for cleansing skulls and popping green-glow zombies; run Deadshot Daiquiri and hold altars with Fatal Contraption GobbleGums.
KRM-262 / Brecci (PaP)
Close-range clutchStrong in the tight bunker and caves against swarming Spiders and Thrashers; run Jugg + Speed Cola and keep Anywhere But Here! for the dragon cog.
Recommended kit & gum picks
Zetsubou No Shima predates Field Upgrades and Ammo Mods — consumables are GobbleGums; the KT-4 / Masamune and Zombie Shield are your kit (in Recommended loadouts). Anywhere But Here! escapes the tight plant tunnels.
Frag / Semtex Grenade
Clears the spider and Thrasher adds and the flooded lower tunnels.

Monkey Bomb
Vital in the cramped bunker and elevator descent — throw and reposition.
Alternate Ammo Type
PaP for a random AAT; Fire Works and Thunder Wall-style rolls thin the spider swarms while you charge the KT-4.

Perkaholic
Ultra-RareEvery perk at once.

Aftertaste
MegaKeep your perks after a revive (3 rounds).

Anywhere But Here!
ClassicTeleport out of a bad spot with a concussive blast (2×) — a get-out-of-the-tunnels button.

Wall Power
Rare MegaNext wall-buy comes Pack-a-Punched.

Alchemical Antithesis
ClassicEvery 10 points = 1 reserve ammo — refills the KT-4/Masamune.
Perkaholic
Ultra-RareFull perks for whoever pops it.

Phoenix Up
MegaRevive all downed team-mates, perks kept.

Near Death Experience
Ultra-RareProximity revive in the flooded lower area.
Aftertaste
MegaKeep perks through a down.

On the House
Rare MegaFree Random Perk bottle for the team.
GobbleGum reference — Black Ops 3
All 63 Black Ops 3 GobbleGums by tier — Classic (free, packs of 5), Mega, Rare Mega and Ultra-Rare (Black-Market / Liquid Divinium). Filter by tier. Some seasonal/Chronicles gums are grouped as compiled.

Always Done Swiftly
ClassicFaster ADS walk and raise/lower for 3 rounds.

Arms Grace
ClassicRespawn with the guns you bled out with.

Coagulant
ClassicLonger bleedout time.

In Plain Sight
ClassicZombies ignore you (2×, 10s each).

Stock Option
ClassicAmmo drawn from your stockpile, not the magazine (2:30).

Impatient
ClassicRespawn near the end of the current round.

Sword Flay
ClassicMelee does 5× damage (2:30).
Anywhere But Here!
ClassicTeleport to a random location with a concussive blast (2×).

Danger Closest
ClassicZero explosive self-damage for 3 rounds.

Armamental Accomplishment
ClassicFaster weapon switch, melee and item use for 3 rounds.

Firing On All Cylinders
ClassicFire while sprinting for 3 rounds.

Arsenal Accelerator
ClassicCharge your special weapon faster for 10 min.

Lucky Crit
ClassicBetter Alternate Ammo Type proc for 1 round.

Now You See Me
ClassicAll zombies chase only you (2×, 10s).
Alchemical Antithesis
ClassicEvery 10 points earned becomes 1 reserve ammo (2×, 60s).
Projectile Vomiting · Newtonian Negation · Eye Candy · Tone Death
Classic (Whimsical)4 cosmetic-only DLC classics.
Aftertaste
MegaKeep perks on revive (3 rounds).

Burned Out
MegaYour next hit ignites nearby zombies (2 hits).

Dead of Nuclear Winter
MegaSpawns a Nuke (2×).

Ephemeral Enhancement
MegaHeld gun becomes Pack-a-Punched for 60s (2×).

I'm Feeling Lucky
MegaDrops a random power-up (2×).

Immolation Liquidation
MegaDrops a Fire Sale (3×).

Licensed Contractor
MegaDrops a Carpenter (3×).
Phoenix Up
MegaRevive all team-mates with perks.

Pop Shocks
MegaMelee electrocutes (5×).

Respin Cycle
MegaRe-spin the Mystery Box (2×).

Unquenchable
MegaAn extra perk slot when at 4.

Who's Keeping Score?
MegaDrops Double Points (2×).
Idle Eyes · Flavor Hexed · Board Games · Board To Death · +8 more
Mega12 further Megas incl. Crawl Space, Fatal Contraption, Unbearable, Disorderly Combat, Slaughter Slide, Mind Blown (DLC/Chronicles).

Cache Back
Rare MegaDrops a Max Ammo.

Kill Joy
Rare MegaDrops an Insta-Kill (2×).
On the House
Rare MegaDrops a Random Perk Bottle.
Wall Power
Rare MegaYour next wall-buy comes Pack-a-Punched.
Undead Man Walking · Fear in Headlights · Temporal Gift · Crate Power · Bullet Boost · Extra Credit · Soda Fountain
Rare Mega7 further Rare Megas (DLC/Chronicles).

Killing Time
Ultra-RareFreeze all zombies for 20s; shot ones die.
Perkaholic
Ultra-RareEvery perk on the map.
Near Death Experience
Ultra-RareProximity revive with perks (3 rounds).

Reign Drops
Ultra-RareAll core power-ups at once (2×).
Shopping Free · Round Robbin' · Head Drama · Secret Shopper · Profit Sharing · Self Medication · Power Vacuum
Ultra-Rare7 further Ultra-Rares (DLC/Chronicles).
Dark Ops & prestige cards (Black Ops 3)
Black Ops 3 has few Zombies calling cards and mostly no per-map cards; its main-quest cards are on the maps themselves.

Primis Rulz
Dark OpsComplete all the Zombies story quests.

Prestigious Protagonist
PrestigeEnter Prestige after reaching Deresurrectionist (Zombies rank Lv 35).
Visual guides & sources
Screenshots and exact part locations live in these — open one on a second screen.