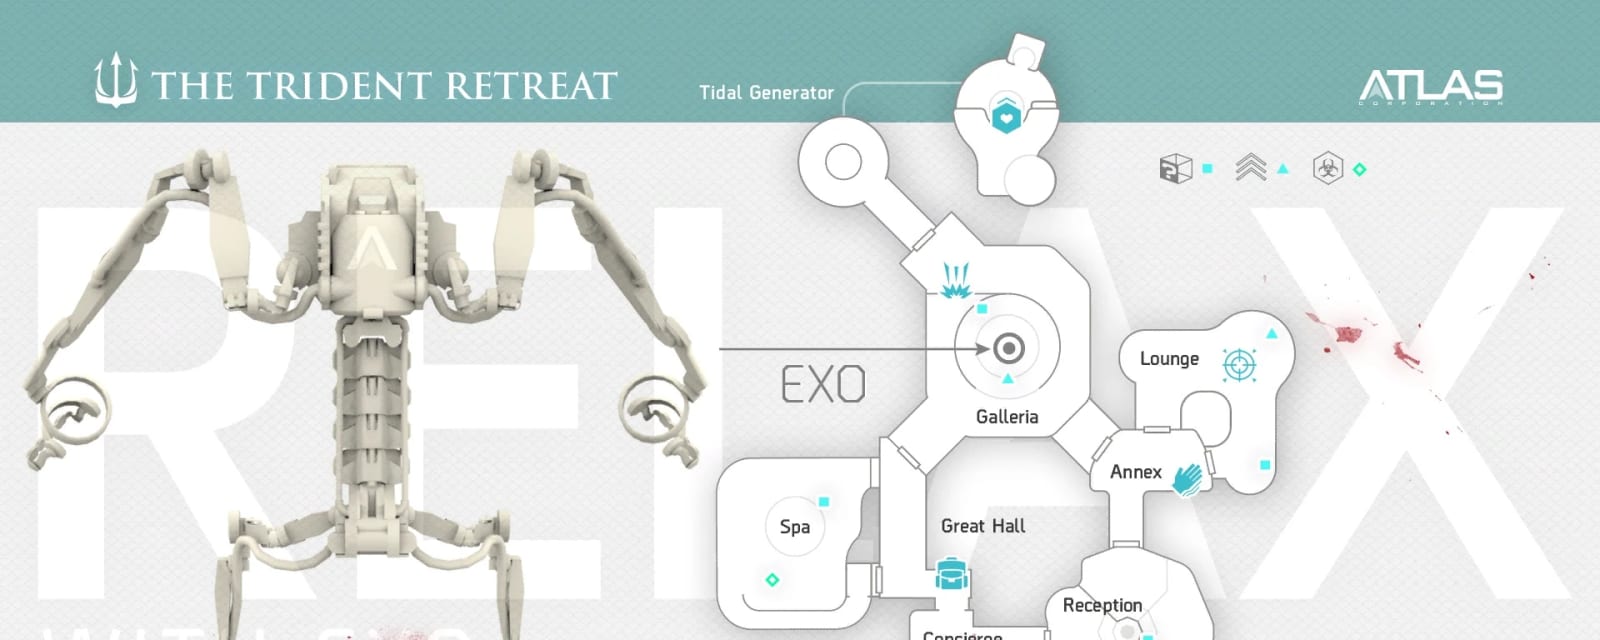

Descent
Descent is the fourth and final Exo Zombies map (Reckoning DLC) — a flooded underwater luxury complex and the climax of the Atlas outbreak story. Its very long, very hard main quest Reunion opens the Tidal Generator secret room, uses an Exo Goliath for a flooded-airlock dive, then runs a chain of Oz challenges around two boss fights against the mutated Oz — a number board, a rocket round and a memory simulation — before reuniting the survivors and permanently unlocking the harder Double Feature mode.
Quick answers
How do you complete the Descent Easter egg?
- Round-based survival for 1-4 players, fully solo-capable; a very-high-difficulty quest (75–120 min) built around a long Oz challenge chain and two boss fights — Oz is the map boss.
- Same Exo systems as the other maps (Exo Suit, local power, 3D Printer, Mark upgrade station, EMZ, infection/decon) plus the Exo Goliath heavy suit needed for the flooded airlock route (normal Exo movement can't substitute).
- Setup gate: turn all three Tidal Generator valve/bolt mechanisms until their blue lights show to open the secret room, depressurize the Lounge airlock (progress is persistent — chip at it on safe round ends), and take the Goliath (drops ~round 8–9) for the underwater switch.
- The first Oz arena has little or no normal point economy, so build one weapon capable of sustained boss damage before round 13 and enter with full ammo and Exo Health.
- Several challenges are round-limited or rule-changing (grenade-only, movement-cost, Simon Says, rocket-only), so save a final zombie before triggering the next interaction and carry Contact Grenades before the grenade round rather than buying under pressure.
- Completing Reunion permanently unlocks Double Feature — a much harder alternate run (spawn keypad) that ends in a fused/final Oz encounter tied to the secret Double Tap challenge; treat it as a separate prepared run, not an extension of a tired completion.
- Useful weapons: KL03-Trident (ricochet, strong in corridors/against drones but risky in co-op Friendly Fire), CEL-3 Cauterizer (drone/boss damage) and the Mk25 MAHEM (the rocket round).
Who is the boss on Descent?
How long does the Descent Easter egg take?
Can you do the Descent Easter egg solo?
Is there a song Easter egg on Descent?
What are the main areas on Descent?
How many side Easter eggs are on Descent?
When was Descent released?
Map & Key areas
The map layout first, then the areas worth knowing by name. Map imagery © Activision, self-hosted.
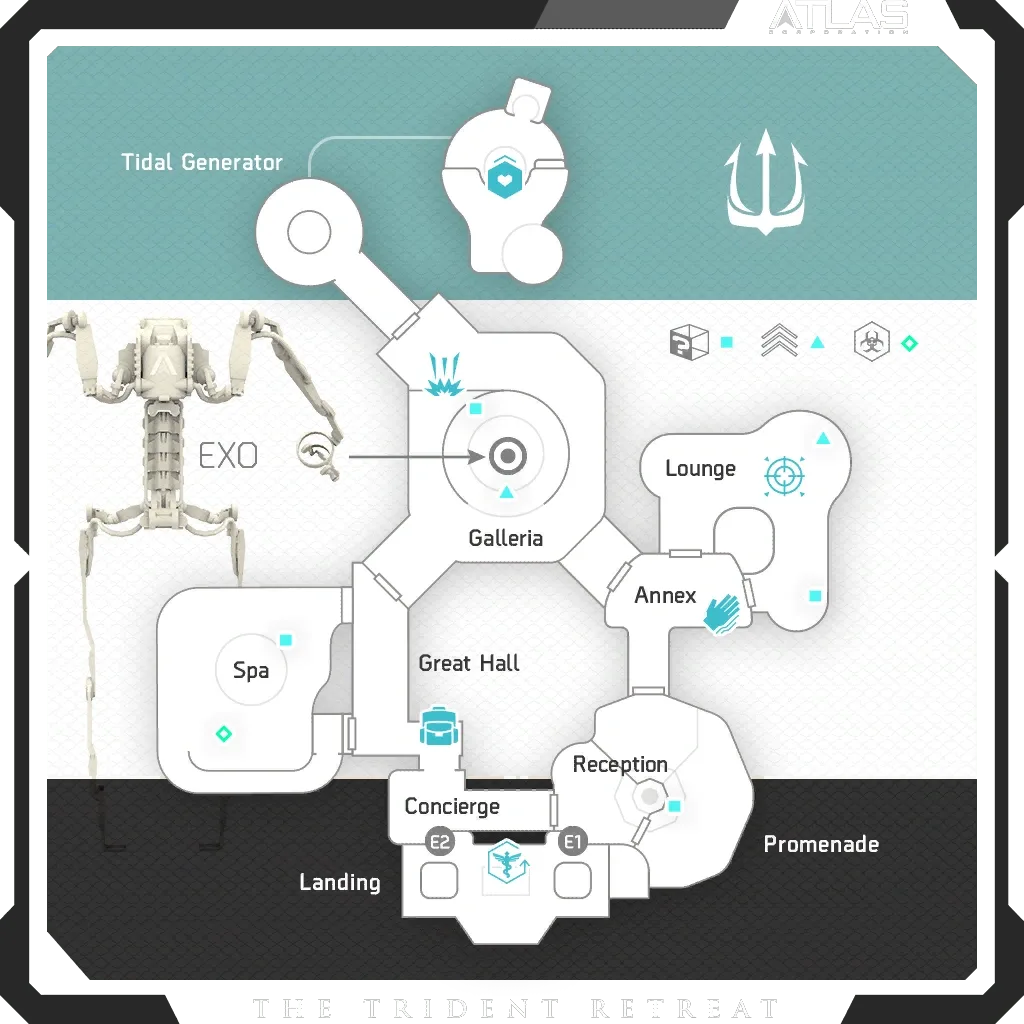
Landing / Spawn
Spawn; the jump-platform challenge over the water and a common Goliath drop point.
Reception / Great Hall
The Simon Says desk console and central routes.
Galleria
The capacitor-charge panel (by the broken aquarium) and a Dies Irae manta-ray toy.
Spa / Promenade
Contact Grenade wall-buy (for the grenade-only round) and a training area.
Lounge / Airlock
The floodable airlock depressurized for the Goliath underwater switch.
Tidal Generator
The three blue-light mechanisms, the secret room (quest console, number board, teleporter, Mk25 station) and the memory-simulation entry.
Steps at a glance
- Round-based survival for 1-4 players, fully solo-capable; a very-high-difficulty quest (75–120 min) built around a long Oz challenge chain and two boss fights — Oz is the map boss.
- Same Exo systems as the other maps (Exo Suit, local power, 3D Printer, Mark upgrade station, EMZ, infection/decon) plus the Exo Goliath heavy suit needed for the flooded airlock route (normal Exo movement can't substitute).
- Setup gate: turn all three Tidal Generator valve/bolt mechanisms until their blue lights show to open the secret room, depressurize the Lounge airlock (progress is persistent — chip at it on safe round ends), and take the Goliath (drops ~round 8–9) for the underwater switch.
- The first Oz arena has little or no normal point economy, so build one weapon capable of sustained boss damage before round 13 and enter with full ammo and Exo Health.
- Several challenges are round-limited or rule-changing (grenade-only, movement-cost, Simon Says, rocket-only), so save a final zombie before triggering the next interaction and carry Contact Grenades before the grenade round rather than buying under pressure.
- Completing Reunion permanently unlocks Double Feature — a much harder alternate run (spawn keypad) that ends in a fused/final Oz encounter tied to the secret Double Tap challenge; treat it as a separate prepared run, not an extension of a tired completion.
- Useful weapons: KL03-Trident (ricochet, strong in corridors/against drones but risky in co-op Friendly Fire), CEL-3 Cauterizer (drone/boss damage) and the Mk25 MAHEM (the rocket round).
Full walkthrough
Open the secret room and dive the airlock
Shoot the three valve/bolt mechanisms (ground floor under the stairs; wall above the yellow door one flight up; beside the top of the second flight) until each rotates and lights blue, opening the yellow secret room — use the console (interact again even on Access Denied). Depressurize the Lounge airlock (hold interact; progress persists). Take the Exo Goliath (~round 8–9), enter the airlock, follow the red-lit underwater route, melee the floating zombie and hit the switch, then return before the suit is lost.
- Three mechanisms lit blue — secret room open
- Lounge airlock depressurized
- Goliath underwater switch activated
Oz challenge chain — phase one
Complete each challenge as it comes: Drone (destroy five flying Treasure Drones in a round — each has a limited window before it flies away, so chase them the instant they appear rather than finishing a train first), Capacitor (stand by the Galleria panel and let shock enemies hit you to 100%), Grenade-only round (buy Contact Grenades from Spa beforehand — the round then grants unlimited Contact Grenades, so the real prep is positioning and Exo Health, not grenade stock), Jump (boost across the glowing platforms at Landing to the target circle), Movement-cost round (every move spends points — hold a position), and Simon Says (repeat the Reception desk sequence to eight inputs).
- Five-drone challenge
- Galleria capacitor charged
- Grenade-only round
- Jump-platform + movement-cost rounds
- Simon Says (8 inputs)
Round 13 — first Oz fight
Shoot Oz through the opened glass behind each of four command consoles. Between openings, survive the arena traps — laser ceiling (don't jump), electric floor (stay off it), infected gas (avoid or use the center decon) and turrets (destroy them) — and repeat until his health is gone.
- Oz damaged through all four console windows
- First Oz fight cleared
Round 20 — defeat mutated Oz
Turn on the four corner generators, then lure Oz onto the central decontamination pad and activate it — he's only vulnerable while the pad runs. Repeat the lure → decon → damage cycle (keeping the floor clear for the lure) until his health reaches zero.
- Four corner generators on
- Mutated Oz killed via decon-pad windows
Friendly Fire and the number board
Complete the Friendly Fire challenge (co-op: finish the round without shooting teammates — no ricochet weapons; solo: evade the invulnerable AI survivors and kill the normal enemies). Then, in the secret room, solve the number board by matching each lower digit to the upper row via its action: 1 = Exo Slam a zombie, 2 = jump, 3 = buy grenades, 4 = kill/allow a zombie to die.
- Friendly Fire challenge completed
- Number board matched (actions 1–4)
Rocket round → the final memory
Finish the rocket-only round (the Mk25 MAHEM with unlimited rockets, very slow movement and self-damage — keep distance from targets and walls). Then immediately return to the secret room: every player interacts with the blue console and the teleporter, survives two rounds on the small floating memory map (resembling Outbreak spawn), and returns through the completion sequence — unlocking Reunion and Double Feature.
- Rocket-only MAHEM round completed
- All players used the console + teleporter
- Two memory-map rounds survived — Reunion complete
Side Easter Eggs & extras
Everything beyond the main quest. Tap any entry to open the full how-and-where breakdown.
Oz
The map's boss, fought twice: at round 13 through four console glass windows amid arena traps, and at round 20 as the mutated form, vulnerable only while lured onto the running central decontamination pad.
Double Feature
Permanently unlocked by finishing Reunion: a much harder run activated from the spawn keypad, ending in a fused/final Oz encounter tied to the secret Double Tap challenge. Start it fresh with a prepared team, not off a tired completion.
Exo Goliath
A heavy Exo suit (drops ~round 8–9 at Landing or the roof near Exo Health / Tidal Generator) — the only way to survive the flooded airlock route to the underwater switch.
“Dies Irae”
Interact with three manta-ray toys (no prompt) — Galleria (by the smashed-glass round aquarium near the Bartoluccini's sign), the Concierge elevator shaft (high on the left wall, boost-jump), and the Tidal Generator exterior (teleporter-platform edge facing the ocean). The third starts the full track.
Trident / Cauterizer / MAHEM
The KL03-Trident ricochets (great in corridors and on drones, risky in co-op Friendly Fire), the CEL-3 Cauterizer handles drones and boss damage, and the Mk25 MAHEM is issued for the rocket round — the Tidal secret room's experimental station reaches Mk25.
Recommended loadouts
Three strong picks for this map — the map's Wonder Weapon plus reliable box/wall options. These are pre-augment-era games, so the setup is the gun plus Pack-a-Punch and perk synergy.
KL03-Trident
Ricochet energyReflected-energy bolts ricochet down corridors and shred drones — but they're unpredictable near teammates, so holster it during the co-op Friendly Fire challenge.
CEL-3 Cauterizer / Mk25 MAHEM
Boss & rocket damageThe CEL-3 Cauterizer is strong drone and boss damage; the Mk25 MAHEM is issued for the rocket-only round. Build one sustained boss weapon before round 13 — the first Oz arena won't fund one for you.
Visual guides & sources
Screenshots and exact part locations live in these — open one on a second screen.