
Shi No Numa Reborn
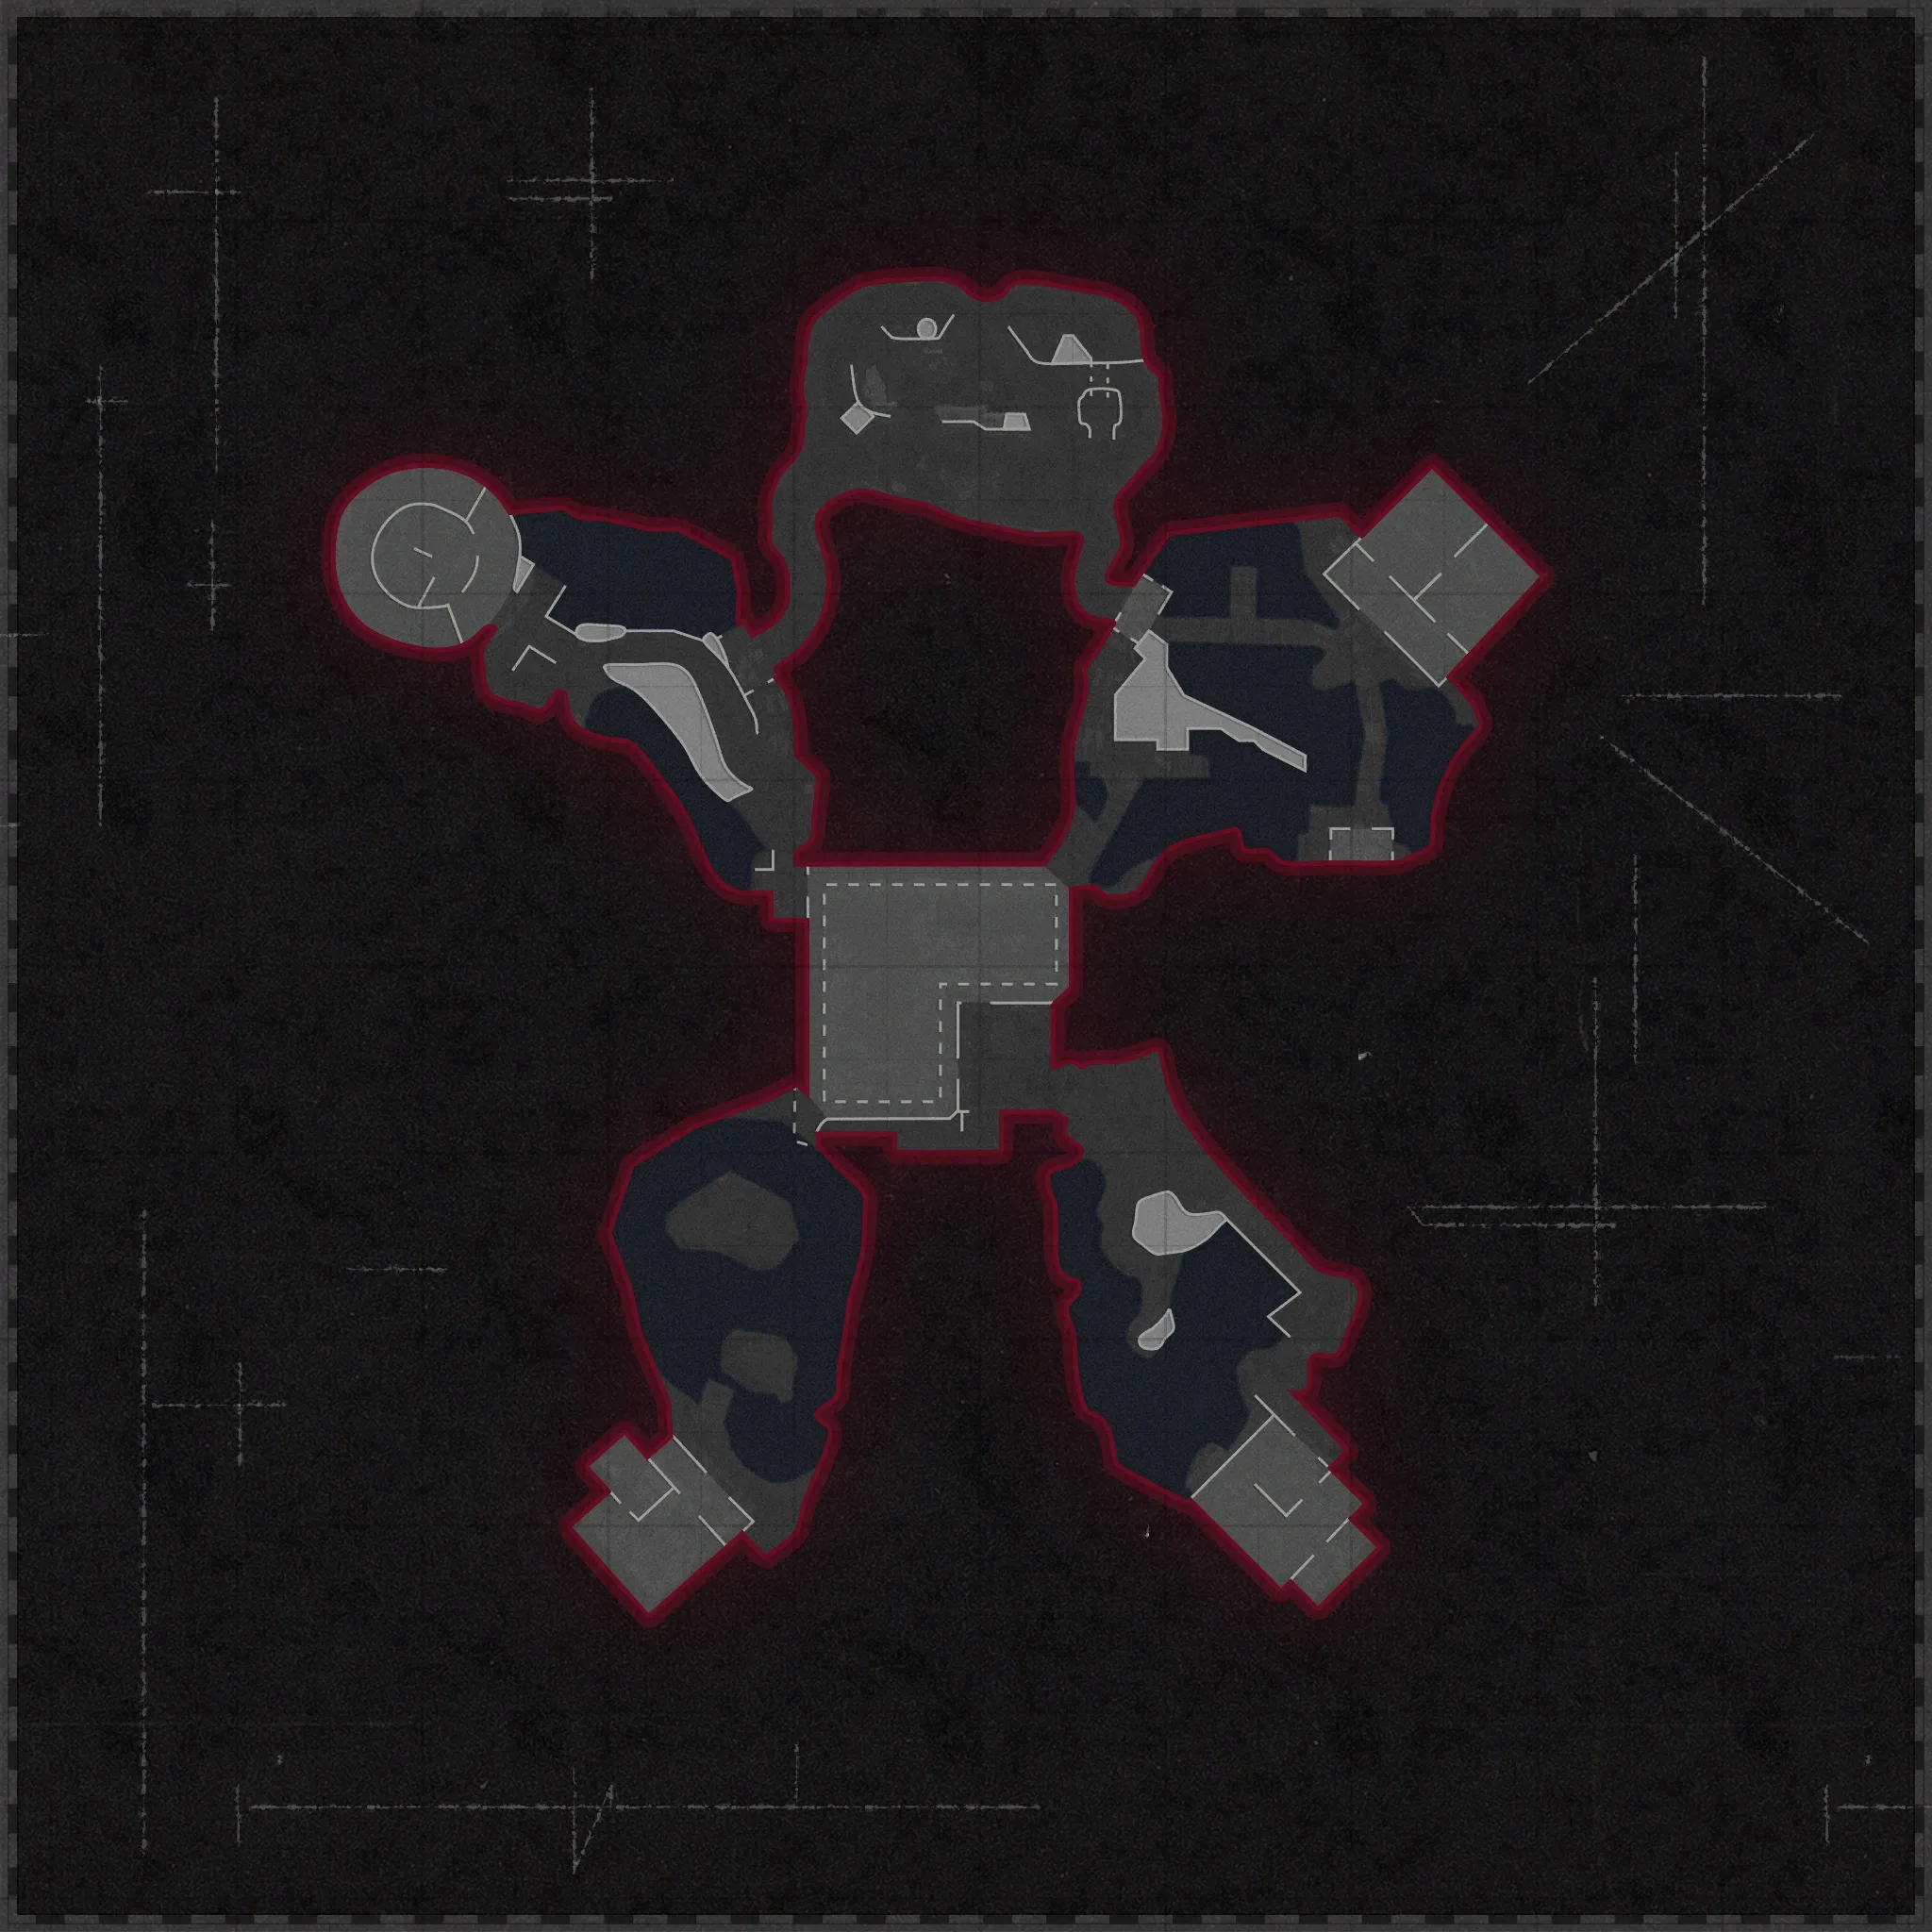
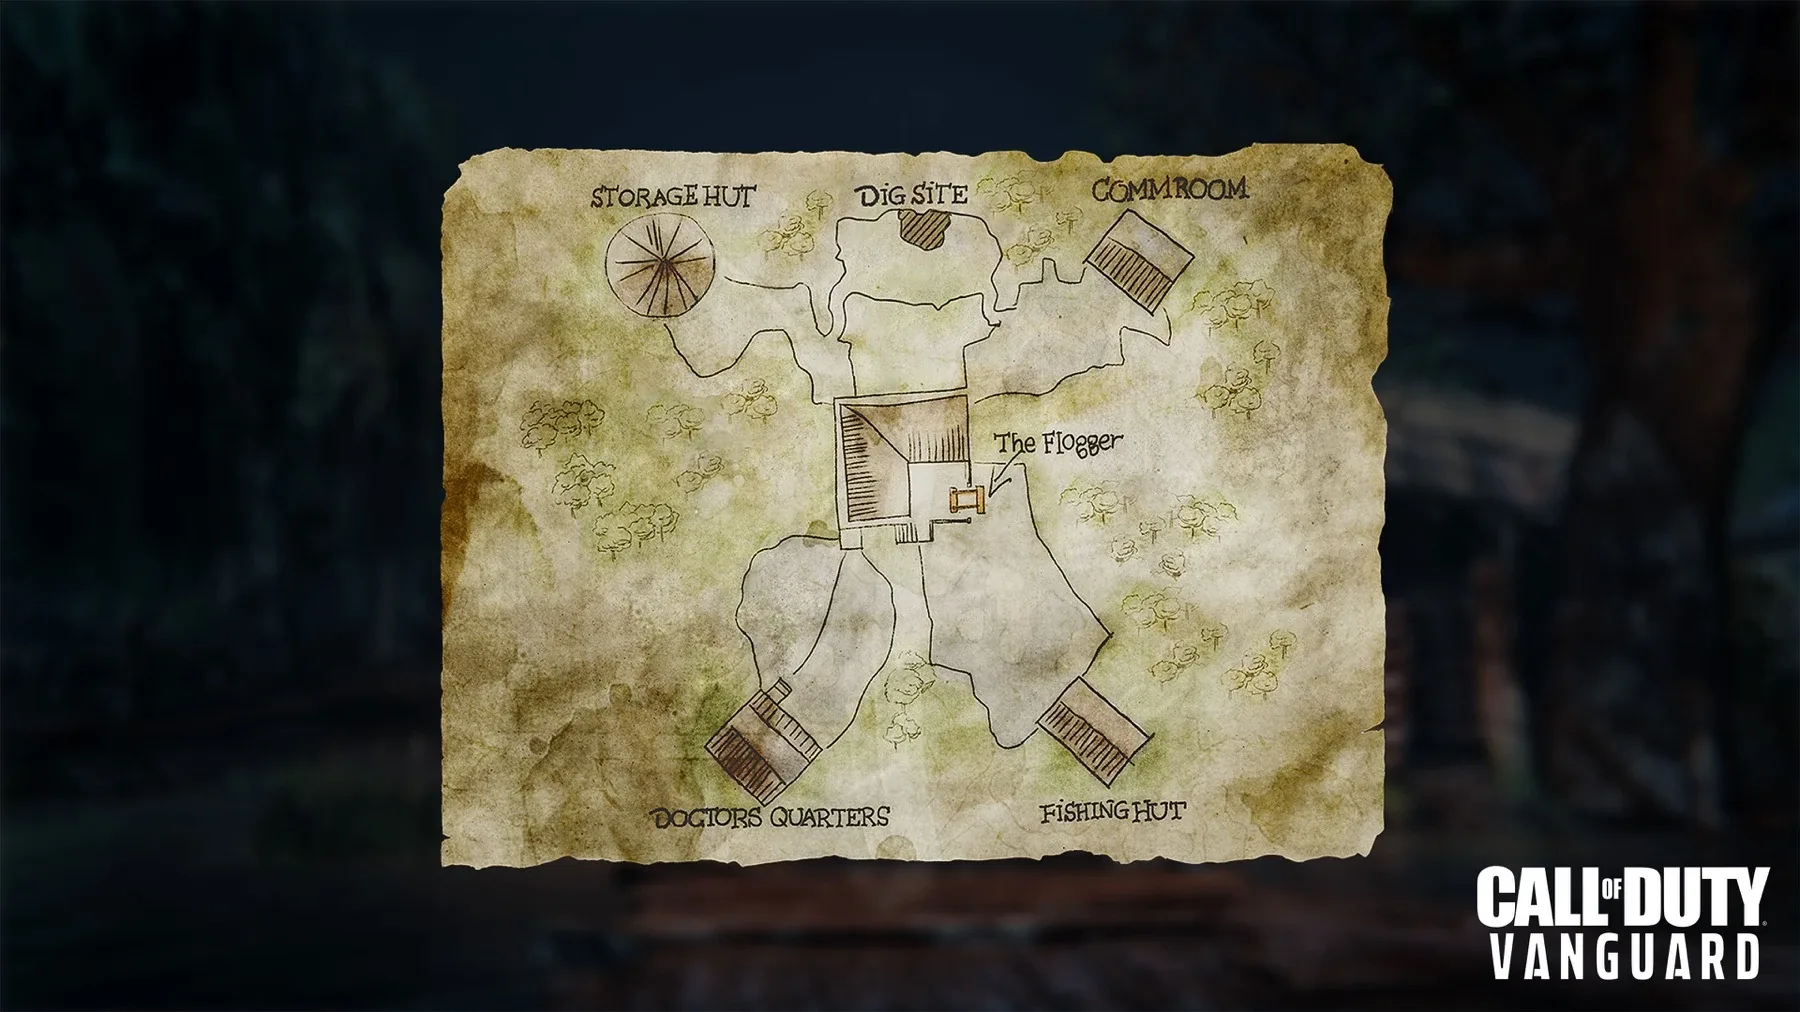
Shi No Numa Reborn is Vanguard's first traditional round-based Zombies map — a swamp of huts around the Main Hut, Doctor's Quarters, Fishing Hut, Comm Room, Storage Hut and the Dig Site. Its full main quest builds the Wunderwaffe DG-2, solves the Monolith cipher and blue-mist ceremony, repairs a shattered mirror using Zombie Blood, runs four blue-orb routes, and ends in a lockdown boss fight against the Echo of Saraxis.
Quick answers
How do you complete the Shi No Numa Reborn Easter egg?
- Round-based main quest for 1-4 players, fully solo-capable: Monolith ceremony → mirror fragments → blue-orb routes → Echo boss.
- The Wunderwaffe DG-2 is the map Wonder Weapon (build from a barrel + three vacuum tubes) and is required to charge the ceremony shrine and the boss's mirror.
- Pack-a-Punch is at the Dig Site; final prices 5,000 / 15,000 / 30,000.
- Point of no return: all players interacting with the blue orbs at the Dig Site summons Echo and locks the match into the irreversible boss fight — finish every prep first.
- Round-15 gate: the guaranteed third Wunderwaffe tube needs Zaballa (reliable from round 15), so complete the Monolith, the first two tubes and the mirror prep before then.
- Shared Vanguard systems apply — perk fountains (prioritise Fiendish Fortitude Tier III+ and Demonic Frenzy for the boss), the Altar of Covenants, and Artifacts (Aether Shroud for safety, Energy Mine or Ring of Fire for boss burst).
- Special enemies: Boom Schreier, Sturmkrieger, Zaballa and the Echo boss.
What is the Wonder Weapon on Shi No Numa Reborn?
Who is the boss on Shi No Numa Reborn?
How long does the Shi No Numa Reborn Easter egg take?
Can you do the Shi No Numa Reborn Easter egg solo?
Is there a song Easter egg on Shi No Numa Reborn?
What are the main areas on Shi No Numa Reborn?
How many side Easter eggs are on Shi No Numa Reborn?
When was Shi No Numa Reborn released?
Map & Key areas
The map layout first, then the areas worth knowing by name. Map imagery © Activision, self-hosted.
Main Hut / Dormitory
Spawn, wall-buys, a cipher wheel (by the M1 Garand), the red-orb start points and round control.
Doctor's Quarters
The Monolith exterior, a perk fountain, a cipher wheel and the burnable translation sheet — open before round 5.
Fishing Hut
The Wunderwaffe barrel, the Samantha's Sorrow side quest and Flogger access.
Comm Room
Electrical fuse, the first charged tube, a symbol paper and the phone song.
Storage Hut
The electric trap (second tube) and the Wunderwaffe workbench.
Dig Site
Pack-a-Punch, a cipher wheel, the mirror pedestal, the blue-orb routes and the Echo boss arena.
War Room / Excavation Room
The Tesla coil (third tube via Zaballa), a symbol paper and the red-X mirror map.
Steps at a glance
- Round-based main quest for 1-4 players, fully solo-capable: Monolith ceremony → mirror fragments → blue-orb routes → Echo boss.
- The Wunderwaffe DG-2 is the map Wonder Weapon (build from a barrel + three vacuum tubes) and is required to charge the ceremony shrine and the boss's mirror.
- Pack-a-Punch is at the Dig Site; final prices 5,000 / 15,000 / 30,000.
- Point of no return: all players interacting with the blue orbs at the Dig Site summons Echo and locks the match into the irreversible boss fight — finish every prep first.
- Round-15 gate: the guaranteed third Wunderwaffe tube needs Zaballa (reliable from round 15), so complete the Monolith, the first two tubes and the mirror prep before then.
- Shared Vanguard systems apply — perk fountains (prioritise Fiendish Fortitude Tier III+ and Demonic Frenzy for the boss), the Altar of Covenants, and Artifacts (Aether Shroud for safety, Energy Mine or Ring of Fire for boss burst).
- Special enemies: Boom Schreier, Sturmkrieger, Zaballa and the Echo boss.
Full walkthrough
Setup and power
Open the lower Main Hut, then Doctor's Quarters before round 5 (so the first Boom Schreier wave can be used on the Monolith vines). Open the Flogger path to the Fishing Hut, then Comm Room and Storage Hut, and push to the Dig Site for Pack-a-Punch and the boss arena.
Build the Wunderwaffe DG-2
Take the barrel from the Fishing Hut shelf to the Comm Room radio tower; mount it and hold the lightning-strike defense to collect the barrel and the first charged tube. Take the fuse from the Comm Room to the Storage Hut, short out the electric trap to open the fuse box, insert the fuse and restart the trap, then feed zombies into it until the second tube lights up. From round 15, lure Zaballa to the War Room Tesla coil and bait five of her energy-mine attacks into it for the third tube. Craft the DG-2 at the Storage Hut workbench and keep it through the quest.
- Barrel + first tube (Comm Room)
- Fuse trap + second tube (Storage Hut)
- Third tube via Zaballa Tesla coil (round 15+)
- Wunderwaffe DG-2 crafted
Prepare the Monolith
Detonate three Boom Schreiers beside the vine-covered Monolith (round 5 is the easiest first chance). Collect the three cipher wheels — by the M1 Garand wall-buy (Dormitory), in the room beside the perk fountain (Doctor's Quarters), and on the table in front of Pack-a-Punch (Dig Site) — and interact with the Monolith to mount all three.
- Monolith vines cleared (3 Boom Schreiers)
- Three cipher wheels installed
Solve the cipher and set the Monolith
Read the three symbol papers (War Room — break the books to reveal it — Dig Site, Comm Room) and record them exactly. In Doctor's Quarters, burn the reference sheet with a Molotov/thermite to reveal the translation key and convert the three live symbols. Rotate the Monolith wheels to the translated symbols; a correct set spawns one glowing start stone per player.
- Three live symbols read + translated
- Monolith wheels set — start stones spawned
Complete the blue-mist ceremony
With the Wunderwaffe in hand, every player interacts with a stone to begin the lockdown. Kill blue-mist zombies close to the shrine with the DG-2 to charge it — success spawns a blue orb (a failure just retries on a later round).
- Ceremony started (all players)
- Shrine charged — blue orb spawned
Repair the mirror
Activate the Flogger to fling zombies into the empty Demonic Fountain until it fills with blood, then drink Zombie Blood (~45s; zombies can still hit you). While in Zombie Blood: read the red X on the War Room map, go to the marked hut and shoot the mirror fragment in its ceiling; and start the red orb at one of its three Main Hut points (its start decides the endpoint — Doctor's exterior, Fishing Hut or Dig Site) and collect the fragment that forms. Install both fragments on the Dig Site central pedestal to repair the mirror.
- Zombie Blood used
- Hut ceiling fragment collected
- Red-orb fragment collected
- Mirror repaired (both pieces placed)
Run the four blue-orb flights
Interact with a blue orb, use its starting pedestal to identify the destination, then find and shoot it repeatedly until it returns. A timed-out orb resets safely to the Dig Site — the routes are repeatable and don't fail the quest. Complete all four.
- All four blue-orb routes returned
Defeat the Echo of Saraxis
All players touch the blue orbs to summon Echo — the match now locks into the boss. Charge the mirror by killing the required blue-mist enemies near the central pedestal with the Wunderwaffe until a blue dome forms, pull Echo inside it and burn the mask (damage outside the dome doesn't count). Repeat across three phases — zombies, then blue-mist Boom Schreiers, then blue-mist Sturmkriegers — destroying all three masks. If a threshold is missed the phase resets and the mirror must be recharged. Echo falls, Saraxis's memories are restored, and every player is awarded a guaranteed Ray Gun as the main quest completes.
- Three Echo masks destroyed inside the dome
- Completion cutscene / reward
Side Easter Eggs & extras
Everything beyond the main quest. Tap any entry to open the full how-and-where breakdown.
Wunderwaffe DG-2
Built from a barrel + three vacuum tubes (or, less reliably, from the Mystery Box after the round threshold). Required to charge the ceremony shrine and Echo's mirror — the quest's key weapon.
“The One” (instrumental)
Interact with the telephone in the Comm Room.
“Samantha's Sorrow” (Shi No Numa · BO3)
Black Ops 3 / Zombies Chronicles only. A second hidden song plus a free Max Ammo — shoot four hanging pans, then hunt the dolls. The starting 1911 requirement is what most players miss. Full steps below.
- Black Ops 3 / Zombies Chronicles only — not in the 2008 original.
- Shoot the 4 silver plates/pans hanging on the Fishing Hut walls with your starting 1911 pistol, in any order — a Samantha scream confirms each (the 1911 requirement is what most players miss)
- Pick up the Samantha doll on the ground in the Fishing Hut side room
- Shoot the 5-6 dolls that spawn one at a time on the bridge outside the Fishing Hut
- Interact with the ground doll again to start “Samantha's Sorrow” and spawn a free Max Ammo
Mister Peeks
Once Zombie Blood is unlocked, collect three bunny pieces — under the zipline platform, in the water outside the Fishing Hut, and at the Mystery Box's previous spot while it moves — for points and a Fire Sale.
Rampage Inducer
Quickly shoot the five lanterns outside the spawn windows; a tablet appears that accelerates early rounds.
Flogger & Storage electric trap
The Flogger is strong crowd control and mandatory for the mirror quest (time it so teammates are clear); the Storage trap doubles as a Wunderwaffe tube step and a late-round kill tool — leave an exit before activating it.
Recommended loadouts
Three strong picks for this map — the map's Wonder Weapon plus reliable box/wall options. These are pre-augment-era games, so the setup is the gun plus Pack-a-Punch and perk synergy.
Wunderwaffe DG-2
Wonder Weapon (built)Barrel + three vacuum tubes (the third via Zaballa's Tesla coil from round 15). Chains lightning between enemies and is required to charge the ceremony shrine and Echo's mirror — keep it through the whole quest.
Shotgun + Aether Shroud
Elite control / safetyRecommended start: a shotgun for Sturmkriegers, Aether Shroud for safe setup, then Energy Mine or Ring of Fire for the Echo mask windows.
Visual guides & sources
Screenshots and exact part locations live in these — open one on a second screen.