

Urzikstan
Modern Warfare III Zombies (Operation Deadbolt) breaks the round-based mould — it's a single, huge open-world extraction map, Urzikstan, split into Low / Medium / High threat zones that you deploy into, complete contracts and quests across, and exfil from with your loot. Rather than one boss egg, it holds a whole web of them: a four-part Act 4 story spine (each mission a boss and an anchor relic) that permanently unlocks the four Dark Aether rifts, plus the secret Greylorm world boss, three hidden blueprint quests, free-perk challenges, rituals, a chess vault and more.
Quick answers
How do you complete the Urzikstan Easter egg?
- Open-world extraction mode for up to a full squad (and other squads share the server): deploy, complete contracts/quests across Urzikstan, and exfil with your rewards before the timer or the Aether Storm ends the match.
- The 'main quest' is the Act 4 story spine the mode itself recommends: complete the four story-gateway missions (Bad Signal → Countermeasures → Union → Ascension), each ending in a boss and a gold anchor relic, then use those relics to permanently unlock the four seasonal Dark Aether rifts.
- Each Dark Aether portal needs four gold relics: the gateway's already-gold anchor plus three purple companion relics you gather in Urzikstan and upgrade to gold (via Aether Tear rifts, Tier 3 triangle rituals, or landmark offerings). Place all four at the matching pedestal, beat the guardian, and the portal is a one-time account unlock — afterward it just needs a Sigil.
- Regular vs Elder Sigils: Regular is lower-pressure with a longer timer (learn routes, gather classified acquisitions); Elder is Tier 5 enemies on a short clock and is where schematics and the hidden blueprint quests live.
- Progression is by rarity (blue→purple→orange) + Pack-a-Punch (I/II/III), plus a persistent stash and craftable schematics (Dog Bone, Golden Armor Plate, Aether Blade, Scorcher, etc.) — the reward loop, not high rounds, is the endgame.
- Shared-world caveat: world events, rituals and the Greylorm/Unstable-Rift portals can be taken or completed by another squad. Keep irreplaceable relics in your stash and upgrade them across separate matches if a step won't register.
- This card indexes the completable Easter eggs (bosses, permanent unlocks, blueprints, rituals, secrets) — not the normal contracts, Acts 1–3 missions, Warlords, camo grinds or audio logs.
How long does the Urzikstan Easter egg take?
Can you do the Urzikstan Easter egg solo?
What are the main areas on Urzikstan?
How many side Easter eggs are on Urzikstan?
When was Urzikstan released?
Map & Key areas
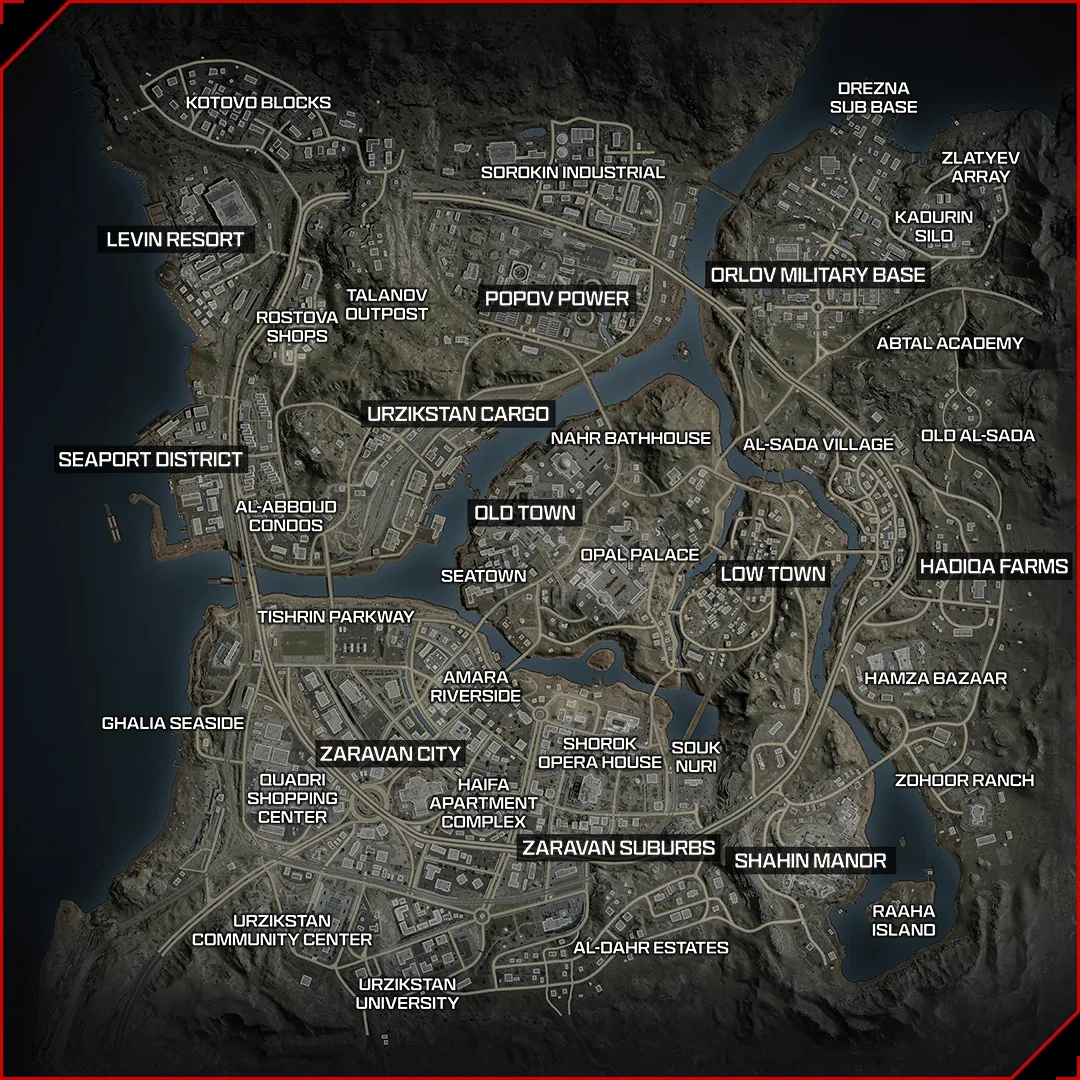
The map layout first, then the areas worth knowing by name. Map imagery © Activision, self-hosted.
Threat zones
Low / Medium / High Threat and the Tier 3 zone — enemy tier and reward quality rise with the zone; most quest steps specify a threat level.
Act 4 anomalies
Named portals (south of Tier 3, F4, E4, F5 Opal Palace) that enter the four story-gateway missions.
Red Zone pedestal sets
F6 (Al Bagra), G4 (Sa'id City), E4 (Zarqwa), F5 (Downtown Al Mazrah) — where four gold relics open each permanent Dark Aether portal.
Aether Nests / Strongholds
Infested interiors for high-value loot, Aetherium crystals, and relic steps (Brain Rot cysts, Harvester Orbs).
Orlov Military Base
The Greylorm clue wall (USB tower locations) in the north-east building.
Landmarks
Shahin Manor (H7 chess vault + PHD challenge), Zohoor Ranch, Mercenary Camps, Doghouses, and the Red Zone Pay Respects memorial.
Steps at a glance
- Open-world extraction mode for up to a full squad (and other squads share the server): deploy, complete contracts/quests across Urzikstan, and exfil with your rewards before the timer or the Aether Storm ends the match.
- The 'main quest' is the Act 4 story spine the mode itself recommends: complete the four story-gateway missions (Bad Signal → Countermeasures → Union → Ascension), each ending in a boss and a gold anchor relic, then use those relics to permanently unlock the four seasonal Dark Aether rifts.
- Each Dark Aether portal needs four gold relics: the gateway's already-gold anchor plus three purple companion relics you gather in Urzikstan and upgrade to gold (via Aether Tear rifts, Tier 3 triangle rituals, or landmark offerings). Place all four at the matching pedestal, beat the guardian, and the portal is a one-time account unlock — afterward it just needs a Sigil.
- Regular vs Elder Sigils: Regular is lower-pressure with a longer timer (learn routes, gather classified acquisitions); Elder is Tier 5 enemies on a short clock and is where schematics and the hidden blueprint quests live.
- Progression is by rarity (blue→purple→orange) + Pack-a-Punch (I/II/III), plus a persistent stash and craftable schematics (Dog Bone, Golden Armor Plate, Aether Blade, Scorcher, etc.) — the reward loop, not high rounds, is the endgame.
- Shared-world caveat: world events, rituals and the Greylorm/Unstable-Rift portals can be taken or completed by another squad. Keep irreplaceable relics in your stash and upgrade them across separate matches if a step won't register.
- This card indexes the completable Easter eggs (bosses, permanent unlocks, blueprints, rituals, secrets) — not the normal contracts, Acts 1–3 missions, Warlords, camo grinds or audio logs.
Full walkthrough
Gateway 1 — Bad Signal (→ Locked Diary)
Select Bad Signal as the active story mission, enter its portal, break the four seals (kill zombies close to feed each), then fight Gorm'gant on the beach — hit the glowing worm weak points and reposition when it burrows. Loot the Locked Diary (the gold anchor for the Season 1 / Al Bagra rift) and exfil.
- Four seals broken
- Gorm'gant defeated
- Locked Diary secured
Gateway 2 — Countermeasures (→ Drum)
Enter the F4 anomaly, escort the ACV, destroy 15 spores, defend the PND Outlast, then defeat the empowered Mangler Krawvir for the gold Drum (Season 2 anchor). Grab the three purple companion relics in the same run — MMA Gloves (ship deck), Perforated Target (E3) and Pristine Mirror (I8) — to save a second entry.
- ACV escorted, 15 spores, Outlast held
- Krawvir defeated → Drum
- Three purple relics collected
Gateway 3 — Union (→ Giraffe Toy)
Follow the orb trail, shoot each crystal's hidden symbols in the humming left-to-right order to destroy both crystals, break three seals, then banish the Disciple boss Taoxia (kill her linked minions to drop the shield). Take the gold Giraffe Toy (Season 3 anchor). This also unlocks the Tier 3 triangle upgrade system.
- Crystals solved + destroyed
- Three seals broken
- Taoxia banished → Giraffe Toy
Gateway 4 — Ascension (→ Mr. Peeks)
Enter at the Opal Palace gazebo, use the blue crystal ramps (destroy red ones), cleanse two energy sources while protecting Dr. Jansen, cross the floating route to the tower, then defeat The Entity (weak points + orbiting orbs, jump pads for elevation). Take Mr. Peeks, the final anchor — Ascension is the mode's last story mission.
- Crystal traversal + two cleanses
- Tower reached
- The Entity defeated → Mr. Peeks
Open the four Dark Aether rifts
For each portal, upgrade its three purple companion relics to gold — via Aether Tear gold-rifts (Season 1), landmark offerings (Season 2's gym/range/graveyard), the Tier 3 triangle rituals (Season 3), or the Echo chains (Season 5) — then place all four gold relics on the matching pedestal set and defeat the guardian to collect the Sigil. Each portal is then a permanent account unlock, re-enterable with a Regular or Elder Sigil for schematics.
Pedestal matching: each pedestal shows an ammo-mod icon, and a relic goes on the pedestal of the mod it was found under — e.g. Dog Collar = Napalm Burst, Surveillance Camera = Dead Wire, Locked Diary = Cryo Freeze, Pill Bottle = Brain Rot. Aether Tear upgrade: the tear launches you skyward — while airborne, parachute into the second tear with the relic held to progress it (players regularly miss the second tear and think the step failed). Inside each rift: its three contracts are picked up from three Mr. Peeks dolls at fixed spawns, and completing them drops the Golden Armor / Dog Bone / Aether Blade items and their schematics.
- Rift 1 (F6 Al Bagra) unlocked
- Rift 2 (G4 Sa'id City) unlocked
- Rift 3 (E4 Zarqwa) unlocked
- Rift 4 (F5 Downtown Al Mazrah) unlocked
Side Easter Eggs & extras
Everything beyond the main quest. Tap any entry to open the full how-and-where breakdown.
Greylorm (Red Worm)
Read the Orlov Military Base clue wall for this match's four USB tower locations (Alpha–Delta), collect them, find the two Refractor terminals, and when the end-of-match Aether Storm expands over them insert all four USBs to summon Greylorm. Shoot the red weak points and dodge the burrow/slam — drops can include the Legendary Aether Tool, Flawless Aetherium Crystal or Scorcher schematic.
Geode (MCW)
The cleanest blueprint quest: enter the Season 1 rift with an Elder Sigil and complete all three contracts (Escort, Outlast, Bounty) in that one Elder run. The Geode MCW blueprint unlocks on the full triple — don't exfil after only one or two.
Smoke Signals (RAM-7)
Inside the Season 3 (E4) rift: after the contract triple, destroy three small spores around the central island, destroy the Rift Heart, then defeat the Disciple boss Gyanxi (kill its linked minions when it goes immune). Rewards the animated RAM-7 blueprint.
Infinite Cosmos (STG-44)
The longest chain, in the Season 5 Elder rift: Inhibitor the hidden spore for the R4D device → follow the route to a Damp Gold Skull → trade it at the Golden Whale for the IT Thumb Drive → computer at C3 → Keyholder Mangler drops the Maintenance Tower Key → whole squad into the Highrise maintenance room → defeat Entity's Echo. Unlocks the STG-44 blueprint.
Unstable Rift
Activate three obelisks (equip and kill with the engraved ammo mod inside each circle) to open a red rift, then survive five escalating waves. The first clear awards the Mark of the Survivor camo and resets insured-weapon/schematic cooldowns. Shared event — move the moment the portal appears.
Shahin Manor chess vault
Collect four chess Transmissions — Bishop (D1 rail tunnel boss), Knight (roaming armored truck), Rook (C5 Ghalia hotel, 4th floor) and the Pawn (I1 Zlatyev shack pickup) — then open the underground chessboard vault at Shahin Manor for Aether caches and high-value loot.
Mister Peeks challenges (×8)
Eight deterministic challenges each award a specific perk can — e.g. PHD Flopper (dolphin-dive off the Shahin Manor roof into the pool), Jugger-Nog (light the C3 campfire), Speed Cola (vehicle-ramp the D2 eagle statue), Stamin-Up (run the D7 tower stairs), plus Deadshot, Death Perception, Quick Revive and Tombstone. (Elemental Pop has no verified challenge.)
Tier 3 triangle rituals
Three High-Threat sites: shoot the three purple runes, stand at the alignment viewpoint until the broken markings form a complete triangle, summon and kill the elite inside the zone. They double as the Season 3 gold-relic upgrade stations, and otherwise pay a Legendary Aether Tool + Flawless Aetherium Crystal.
Friendly Hellhound (You Can Pet the Dog)
Farm Chunks of Flesh (explosive dismemberment; ACV hordes are ideal), deposit the right number into a Doghouse (1 Low / 2 Medium / 3 High Threat) to get a friendly Hellhound that fights and revives — then pet it for the achievement. Also required for the Season 3 Laptop relic (the dog must kill a Mercenary Sergeant).
Pay Respects
At the Red Zone memorial grave, sacrifice the weapon you're holding (it strips rarity, Pack-a-Punch and ammo mod) for a variable Reward Rift refund — tools, crystals, a mod, a perk, or less than you put in. A gamble, not a guaranteed refund.
Rune portals
Paired rune portals across Urzikstan: at an entry portal, shoot the three symbols in the correct destination order (a three-rune address, not random) and pay the Essence cost to fast-travel — handy for Greylorm USB runs and relic sites.
Al Bagra secret key rooms
Inside the Season 1 Dark Aether, four keys (Munitions Storeroom, Antiquities Office, Officers Quarters, Al Bagra Barrack) open locked rooms with Wonder Weapon cases, Full Power/Armor and premium loot. Repeatable loot rooms, not account unlocks.
Recommended loadouts
Three strong picks for this map — the map's Wonder Weapon plus reliable box/wall options. These are pre-augment-era games, so the setup is the gun plus Pack-a-Punch and perk synergy.
Legendary + Pack-a-Punch III
Baseline damageMWZ scales by rarity (blue → purple → orange) and Pack-a-Punch tier (I/II/III). A Legendary, Pack-a-Punch III primary with a large magazine is the baseline for the Tier 3 zone, the Act 4 bosses and Elder Dark Aether rifts — build one before the story gateways.
Wonder Weapons & schematics
Aether firepowerWonder Weapons (Ray Gun, Scorcher, V-R11, the Aether Blade) come from Dark Aether rewards, Mystery Boxes and schematics you craft in your stash. The Aether Blade is itself a quest requirement — the final rift's Echo of Locked Diary needs five Mimic kills with it.
Ammo mods
Quest toolsNapalm Burst, Cryo Freeze, Dead Wire, Brain Rot and Shatter Blast aren't just damage: specific relics, Unstable-Rift obelisks and rituals only count kills made with a named mod, so keep the right one equipped for each step (e.g. Dead Wire for the Surveillance Camera Harvester Orb).
Visual guides & sources
Screenshots and exact part locations live in these — open one on a second screen.